Showing posts with label to. Show all posts
Showing posts with label to. Show all posts
Saturday, September 10, 2016

Friday, September 9, 2016
HTC Unlock and Root Return to Stock HTC Desire 610
HTC Unlock and Root Return to Stock HTC Desire 610

HTC Unlock and Root/Return to Stock HTC Desire 610
click here
Genaral Information:
Size | 143.1 x 70.5 x 9.6mm |
Weight | 143.5g |
Display | 4.7 inch, FWVGA |
CPU Speed | Qualcomm® Snapdragon™ 400, 1.2 GHz, quad-core CPUs |
Platform Android | Android™ with HTC Sense™ HTC BlinkFeed™ |
SIM Card Type | nano SIM |
Network1 | 2G/ 2.5G - GSM/GPRS/EDGE:
3G/3.5G - WCDMA:
4G - LTE:
|
Memory2 | Total storage: 8GB, available capacity varies RAM : 1GB Expansion card slot supports microSD™ memory card for up to 64GB additional storage (card not included) |
GPS | Internal GPS antenna + GLONASS |
Sensors |
|
Connectivity |
|
Sound |
|
Camera |
|
Multimedia | Audio supported formats:
Video supported formats:
|
Battery3 | Embedded rechargeable Li-polymer battery Capacity : 2040 mAh Talk time:
Standby time:
|
AC Adaptor | Voltage range/frequency: 100 ~ 240 V AC, 50/60 Hz DC output: 5 V and 1 A |
Available link for download

HTC Gold card maker Root Tutorial Official rom flashing important note Easy Way to find yur Correct firmware for yur model
HTC Gold card maker Root Tutorial Official rom flashing important note Easy Way to find yur Correct firmware for yur model
Imp Notes :

* To update vit official Rom yu hav to relock yur bootloader nd update yu mobile relock command below do it on fastboot mode
* if yu are unlocked yur bootloader yu can not flash yur mobile using official ROMS.
* To update vit official Rom yu hav to relock yur bootloader nd update yu mobile relock command below do it on fastboot mode
fastboot oem lock
* If yu have unlocked rooted nd custom recovery installed in yur mobile yu can flash custom roms nd other rom zip files using it.
* To update original Rom after relocked in fastboot mode check yur cid use **** command
fastboot getvar cid
* To update original Rom after relocked in fastboot mode check yur cid use **** command
fastboot getvar cid
* Yur cid must b lik this example: cid:HTC__044
* if get the cid yu can search correct rom for yur model vit this cid for examble se picr below.
official roms vist here

* if yu unable to find the correct rom for ur cid yu can upadte yur mob by 2 methods 1st is goldcard method 2nd s-off yur mob nd update vit any rom.
* Gold card method 1st post
* For s-off method yu hav to unlock yur bootloader nd root yur mobile den search for s-off locking tool for yur hboot version.once if yu s-off yur mobile yu can flash any official rom but before update yu hav to agin relock the bootloader.
* CID change benefits if yur on s-off change yur cid as super cid Normal cid HTC__044 super cid 111111 yu can edit cid by some tools yu can search it for yu
model via google.
* Once yu get the super cid yu can flash any rom any time but yu can not downgrade if yu need to downgrade yu hav to s-off yur mob.one more thing wen
yur mob on s-off yu can oly flash other official rom once aftr update yur s-off become s-ON. if yu hav change yur cid to super cid no need to wrry about it.
Easy Way to find yur Correct firmware for yur model
* put yur mob into fastboot mode nd cnnt it to the pc
* Run cmd command type fastboot getvar all nd press enter
* After get full details about yur mobile follw the below givn image
* if get the cid yu can search correct rom for yur model vit this cid for examble se picr below.
official roms vist here
* if yu unable to find the correct rom for ur cid yu can upadte yur mob by 2 methods 1st is goldcard method 2nd s-off yur mob nd update vit any rom.
* Gold card method 1st post
* For s-off method yu hav to unlock yur bootloader nd root yur mobile den search for s-off locking tool for yur hboot version.once if yu s-off yur mobile yu can flash any official rom but before update yu hav to agin relock the bootloader.
* CID change benefits if yur on s-off change yur cid as super cid Normal cid HTC__044 super cid 111111 yu can edit cid by some tools yu can search it for yu
model via google.
* Once yu get the super cid yu can flash any rom any time but yu can not downgrade if yu need to downgrade yu hav to s-off yur mob.one more thing wen
yur mob on s-off yu can oly flash other official rom once aftr update yur s-off become s-ON. if yu hav change yur cid to super cid no need to wrry about it.
Easy Way to find yur Correct firmware for yur model
* put yur mob into fastboot mode nd cnnt it to the pc
* Run cmd command type fastboot getvar all nd press enter
* After get full details about yur mobile follw the below givn image
Code:
All cid codes


Cid id and oparetors all htc
SuperCID 11111111
AirTel-India ????????
Asia-HK-CHT HTC__622
ATT CWS__001
BM BM___001
Bouygues-Telecom BOUYG201
Brightstar-PTB BSTAR502
Brightstar-SPA BSTAR301
Chunghwa-Taiwan CHT__601
CT HTCCN702
CU HTCCN703
DCM DOCOM801
DOPOD DOPOD701
Era T-MOB009
Fastweb-IT FASTW401
GOOGLE GOOGL001
H3G-DAN H3G__F05
H3G-Italy H3G__402
H3G-ROI H3G__003
H3G-SWE H3G__G04
H3G-UK H3G__001
HTC-Asia-SEA HTC__037
HTC-Asia-SEA-WWE HTC__044
HTC-Australia HTC__023
HTC-BE HTC__E41
HTC-Czech HTC__C24
HTC-Denmark HTC__F08
HTC-Dutch HTC__E11
HTC-EastEurope HTC__032
HTC-ELL HTC__N34
HTC-FRA HTC__203
HTC-FRA-Bouygues HTC__247
HTC-GCC HTC__J15
HTC-GER HTC__102
HTC-India HTC__038
HTC-ITA HTC__405
HTC-Nor HTC__Y13
HTC-Norway HTC__H10
HTC-Poland HTC__B25
HTC-PTG HTC__506
HTC-Russia HTC__A07
HTC-Singapore ????????
HTC-SPA HTC__304
HTC-Sweden HTC__G09
HTC-Turkey HTC__M27
HTC-WWE HTC__001
Hutch-Australia HUTCH001
O2-DE O2___102
O2-UK O2___001
Open-Channel HTCCN701
Optus-Australia OPTUS001
ORANGE-AT ORANG113
ORANGE-BE ORANG012
ORANGE-CH-FRA ORANG203
ORANGE-CH-GER ORANG104
ORANGE-ES ORANG309
ORANGE-French ORANG202
ORANGE-PL ORANGB10
ORANGE-PO ORANG008
ORANGE-SK ORANG006
ORANGE-UK ORANG001
Rogers ROGER001
SMC-Voda-HK SMCVD001
StarHub-Singapore ????????
TELEF-Spain TELEF301
Telstra TELST001
TELUS TELUS001
TIM-Italy TIM__401
TMA T-MOB102
TMCZ T-MOB004
TMD T-MOB101
TMH T-MOB007
TMHR T-MOB006
TMMK T-MOBL11
TMNL T-MOB003
TMSK T-MOB008
TMUK T-MOB005
TMUS T-MOB010
TWM-TW HTC__621
VIRGIN-UK VIRGI001
VODA-Africa-South HTC__016
VODA-Australia VODAP021
VODA-Germany VODAP102
VODA-Greece VODAP006
VODA-Ireland VODAP019
VODA-Italy VODAP405
VODA-Mobilkom VODAP120
VODA-Netherland VODAPE17
VODA-New-Zealand VODAP022
VODA-Portugal VODAPD18
VODA-Proximus VODAP024
VODA-SA VODAP026
VODA-SFR VODAP203
VODA-Spain VODAP304
VODA-Swisscom-DE VODAP110
VODA-Swisscom-FR VODAP212
VODA-Swisscom-IT VODAP416
VODA-Swisscom-WWE VODAP015
VODA-TR VODAPM27
VODA-UK VODAP001
Available link for download
How to Install CM11 Nightly LG G3
How to Install CM11 Nightly LG G3
How to Install CM11 Nightly LG G3 - European users of the LG G3 began receiving the update to Android 5.0 Lollipop recently, but for those of us in other parts still have to wait. Unless we decide to try some of the excellent custom ROMs that this device has available, including of course one of the most interesting it is to CyanogenMod. Let us see how to install CyanogenMod 11 Nightly LG G3.
This is a ROM based on Android 4.4.4 KitKat AOSP, meaning that for now does not give us the same as Lollipop but has some of its features, and developers are already working on CM12, based on Android 5.0 .

Before you begin, as always we emphasize when performing these procedures, that it will be advisable to make a backup of all our critical data, or if we prefer a Nandroid back to our computer to the current situation if something we do not like. Also, before something like this it is necessary to charge the battery up to 60% or more, and finally we will need USB debugging enabled (that we do in development options).
Now if we can start:
- CM11 Nightly downloaded from this link and do the same with the gapps package from this other link.
- We connect the LG G3 to our PC via USB cable and copy both files to the internal storage.
- Disconnect the phone cable and turn it off.
- We waited a few seconds and turn it on in recovery mode.
- We wipe data, cache and Dalvik.
- We return to the initial screen of the recovery and select install zip from sdcard "and then" choose zip from sdcard. We choose the ROM file and confirm using the Power button.
- We wait a few seconds and repeat the process for archiving the gapps.
- We return to the initial screen of the recovery and select reboot now.
Like every time you install a new ROM, the first reboot must arm ourselves with patience because it takes something more than usual, but at the end we will have installed CM 11 Nightly our LG G3.
Available link for download
Thursday, September 8, 2016
HOW TO GET 5GB WITH 2000 ON MTN SIM
HOW TO GET 5GB WITH 2000 ON MTN SIM
How To Get MTN 1.3GB, 3.75GB, 5GB Data Plans For As Low ?1,000
 Just in time, MTN Nigeria introduced new cheap internet data plans that work on every internet enabled devices
 With just N1,000 you can get 1.3GB of data, and N2,000 for the 3.75GB or 5GB of data.
To Subscribe For this plan:
1.3GB @ N1,000 ~ Text 106 to 131 30 Days
3.75GB @ N2,000 ~ Text 110 to 131 30 Days
5GB + N2560 free airtime @ N2,000 ~ Text D2000 to 131 30 Days
Note: for the MTN 5GB data, you must have migrated to MTN Truetalk by dialing *400# before you can use this plan.
Hope you find this plans useful. With this newly introduced MTN plans, you no longer need to worry about Airtel plans that steals data. Just subscribe and you are good to go.
Happy Surfing!
1.3GB @ N1,000 ~ Text 106 to 131 30 Days
3.75GB @ N2,000 ~ Text 110 to 131 30 Days
5GB + N2560 free airtime @ N2,000 ~ Text D2000 to 131 30 Days
Note: for the MTN 5GB data, you must have migrated to MTN Truetalk by dialing *400# before you can use this plan.
Hope you find this plans useful. With this newly introduced MTN plans, you no longer need to worry about Airtel plans that steals data. Just subscribe and you are good to go.
Happy Surfing!
Available link for download
How To Use Dual Whatsapp Account On Android phone 2016
How To Use Dual Whatsapp Account On Android phone 2016

Dear Friends Method 1:- Dual Whatsapp By Using WhatsMapp 2016
Dear friends WhatsMapp solo is an Amazing App. Friends Now using this App we can Easily create another Whatsapp account on the single Android device. Friends its provide custom icons, F Status bar color changing in Lollipop version. Friends Its one of the important feature is it is a antiban App.
Dual Whatsapp account By Using WhatsMapp 2016
Dear Friends How To Create Account On WhatsMapp 2016
1. Friends First Friends you have to download this App and install into your Android phone. Now you can download it from the button shown below.
Download Here Now Click Here
2. Friends Follow the same steps as you follow to make a whatsapp account. Now Dont use the same number to create an account.
3.Friends If you face some problem then you should backup and remove the original whatsapp and after that install this App.
Now Method 2:- Friends Dual Whatsapp By Using OG WhatsApp
Dear Friends Dual Whatsapp By Using OG WhatsApp 2016
Now Show Steps To Create Account On OGWhatsapp
1. Dear Friends First you have to F backup your chats from the Whatsapp settings. Now You have to go to WhatsApp settings >> chat settings >> Back Up chats.
Dual whatsapp ogwhatsapp chat settings.
2. Friends After that you have go to your phone settings >> Apps >> whatsapp and Now click on it and tap the clear data option.
Android app info clear data for dual whatsapp.
3. Friends Now go to your whatsapp folder whether it is located on phone storage and SD card and rename it to OGwhatsApp.
4. Dear Uninstall your original whatsapp.
5. Friends Now you have to download this App and install into your Android phone. Friends you can download it from the button shown below.
Download Here Now Click Here
6. Now Create your Account and enjoy the trick.
7. Now Download original whatsapp create/ restore your old account. Now you have dual Account.
Dear Friends Note:- Now In some devices second method may and may not works then i recommend to try first method.Thanks
Dear Friends So these are the best possible ways to use dual or two whatsapp account on single android device at same time.And In case you find this trick not working or have any trouble dont forget to share Your Facebook,And Other Site.your precious comment.Thanks
Available link for download
Wednesday, September 7, 2016
How to install the newest Android 5 1 1 for Sony XPERIA Z C6603 firmware 10 7 A 0 228
How to install the newest Android 5 1 1 for Sony XPERIA Z C6603 firmware 10 7 A 0 228

a) first of all, check your firmware version (if you already have the newest one, you do not need this tutorial)
b) download and install latest Flashtool from this Post
c) download also latest Android 5.1.1 (mirror Google Drive) for Sony XPERIA Z
d) paste the ftf file downloaded in step c) to folder „Firmware“ included in the XPERIA Flashtool
e) open the XPERIA Flashtool, click on flash and choose downloaded firmware, than click ok. Important - if you do not want to delete any data of your phone, just uncheck flashing userdata.sin file. All data will remain in your phone, but sometimes it can cause additional troubles. So it is better (and I recommend that) to do the backup of your personal data, than proceed with clean instalation and then restore your personal data.

f) turn off your phone and when Flashtool shows pop up window, connect phone to PC with holding volume down button
g) after few minutes all is done and your phone gets the new firmware
Available link for download
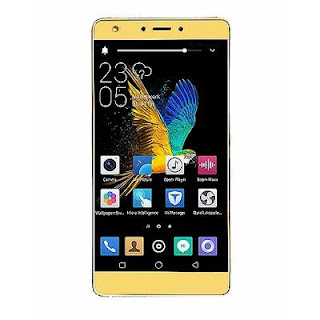
HOW TO ROOT TECNO J8 BOOM
HOW TO ROOT TECNO J8 BOOM

TUTORIAL ON HOW TO ROOT
TECNO J8 BOOM
TECNO J8 BOOM
- Download Kingroot
- Install the app on the phone
- Ensure you have an internet connection on the phone then launch the app
- Wait for all checks to be complete
- Click the center button (with Root and some Chinese texts inscribed on it) to begin rooting
- Wait for rooting to complete
- You should see a green tick to confirm that rooting was successful
Available link for download
How to install TWRP recovery of Moto E
How to install TWRP recovery of Moto E
How to install TWRP recovery of Moto E - I recently saw how to access the recovery in Moto E, and the truth is that although it is an important tool to perform several advanced tasks on our device, is not the same make that comes preinstalled with a more advanced use. Therefore we want to show how to install the recovery of TWRP Moto E, in order to take advantage of its best features when it comes to get their hands on our phone.
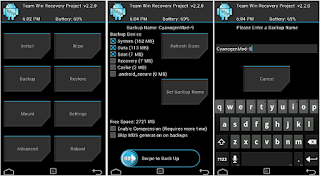
Is that TWRP is a recovery that with the passage of time is becoming standard, in part because of its functionality touch that actually became so popular that even led to the emergence versions of CWM recovery (formerly the most popular) with support for touch screens.
Here we will modify essential part of running our phone, so it is always advisable to make a Nandroid or a backup of critical data (videos, images, music) in order to have them available in case something goes wrong. We will also need the Android SDK, enable USB debugging (between development options) and last but very important to have a battery charging at least 60 percent.
Now if we can start:
- Download the file recovery of TWRP.
- We turn off the Moto E, waited a few seconds and turn on in fastboot mode (by pressing the keys on Volume- and on and holding them for about 6 or 7 seconds).
- We connect the phone to our PC via the USB cable.
- We go to the folder where you have the Android SDK and open a terminal window (command prompt in Windows).
- We write (without the quotes, of course) "fastboot flash recovery.img".
- On the phone, which is in fastboot mode, we pressed to move and select Volume-recovery (by pressing Power).
- Moto E enters recovery mode, although for the first minute or two still will not have the functionality available touch, so be patient.
- Select the option reboot system now and thats it; next time we enter the recovery we will at TWRP.
Available link for download
How To Add All Friends To Facebook Group By One Click 2016
How To Add All Friends To Facebook Group By One Click 2016

- F Steps
- F Steps To Add All Friends in Facebook Groups
- F First of all Log in into that f whose friends you want to invite F.
- F Then open your Facebook Group in which you want to add friends.
- F Now Click F12 button to open debugger and then select console box.
- F Now copy script from below given button.
Get Script Click Here

F Steps:2
- F 1: Now Open google chrome
- F 2:Now Ads This Add-ons
F Press enter and process will start for sending invitation.
- Note:- F Dont worry about anything this script is totally safe. In F case you have too many friends then you get F blocked for using groups or even your account may get locked. So be careful.F
Available link for download
How To Unlock Bootloader Sony Xperia E3 Dual D2212 And Install the newest android 4 4 2
How To Unlock Bootloader Sony Xperia E3 Dual D2212 And Install the newest android 4 4 2
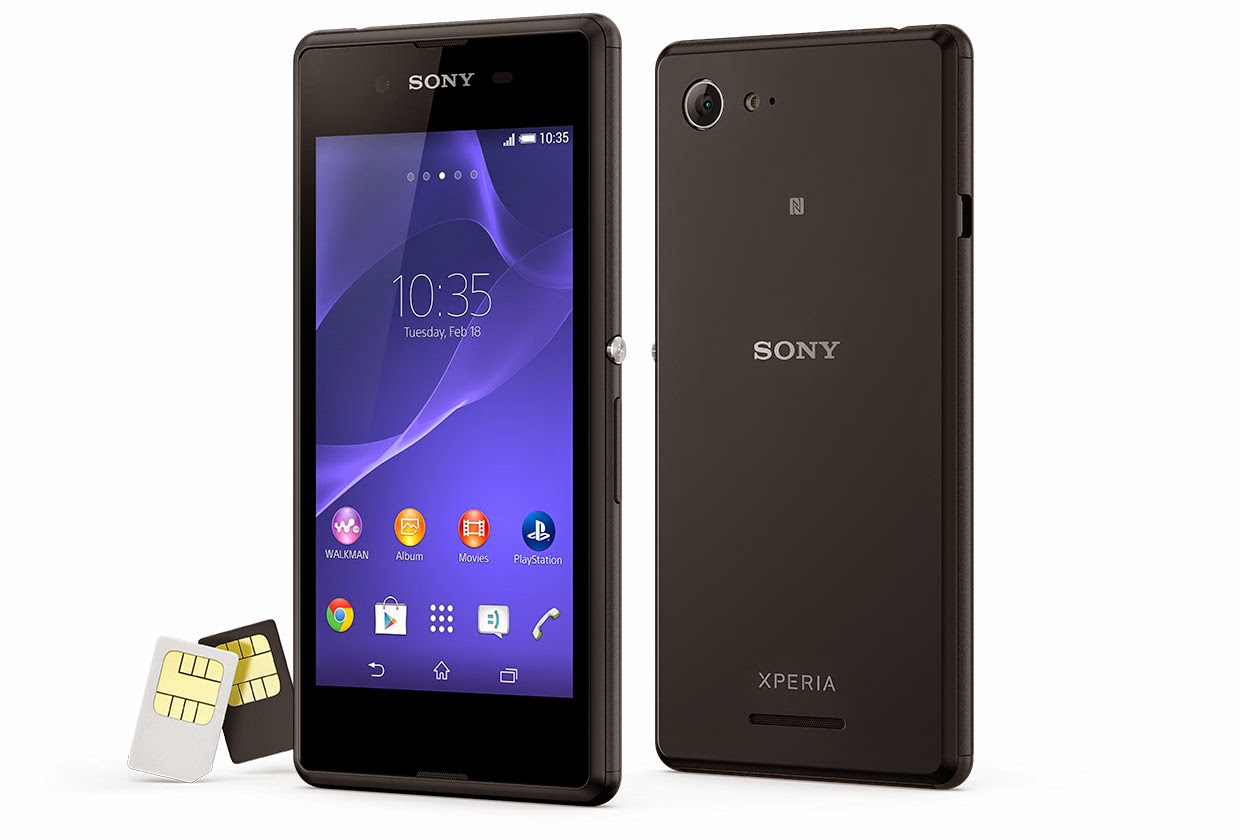
how to unlock your bootloader
a) download and install latest Flashtool from here (mirrors Google Drive, Ulozto or Mega)
b) start Flashtool and click on BLU button on the top
c) turn off your phone and when Flashtool shows pop up window, connect phone to PC with holding volume down button
d) click on get unlock key button, it will switch you to Sony Mobile website, here complete all boxes
e) copy IMEI form Flashtool to Sony Mobile site, than you will get unlock code to your mailbox
f) copy unlock key to Flashtool window and than click unlockg) connect phone with holding volume up button when Flashtool shows pop up window
h) wait to unlock finish.
c) turn off your phone and when Flashtool shows pop up window, connect phone to PC with holding volume down button
d) click on get unlock key button, it will switch you to Sony Mobile website, here complete all boxes
e) copy IMEI form Flashtool to Sony Mobile site, than you will get unlock code to your mailbox
f) copy unlock key to Flashtool window and than click unlockg) connect phone with holding volume up button when Flashtool shows pop up window
h) wait to unlock finish.
how to install the newest Android 4.4.2 for Sony XPERIA E3 Dual D2212
a) first of all, check your firmware version (if you already have the newest one, you do not need this tutorial)
b) download and install latest Flashtool from here (mirrors Google Drive, Ulozto or Mega)
c) download also latest Android 4.4.2 (mirrors Google Drive or Mega) for Sony XPERIA E3 Dual
d) paste the ftf file downloaded in step c) to folder „Firmware“ included in the XPERIA Flashtool
e) open the XPERIA Flashtool, click on flash and choose downloaded firmware, than click ok. Important - if you do not want to delete any data of your phone, just uncheck flashing userdata.sin file. All data will remain in your phone, but sometimes it can cause additional troubles. So it is better (and I recommend that) to do the backup of your personal data, than proceed with clean instalation and then restore your personal data.
f) turn off your phone and when Flashtool shows pop up window, connect phone to PC with holding volume down button
g) after few minutes all is done and your phone gets the new firmware.
b) download and install latest Flashtool from here (mirrors Google Drive, Ulozto or Mega)
c) download also latest Android 4.4.2 (mirrors Google Drive or Mega) for Sony XPERIA E3 Dual
d) paste the ftf file downloaded in step c) to folder „Firmware“ included in the XPERIA Flashtool
e) open the XPERIA Flashtool, click on flash and choose downloaded firmware, than click ok. Important - if you do not want to delete any data of your phone, just uncheck flashing userdata.sin file. All data will remain in your phone, but sometimes it can cause additional troubles. So it is better (and I recommend that) to do the backup of your personal data, than proceed with clean instalation and then restore your personal data.
f) turn off your phone and when Flashtool shows pop up window, connect phone to PC with holding volume down button
g) after few minutes all is done and your phone gets the new firmware.
how to relock your bootloader
a) download and install latest Flashtool from here (mirrors Google Drive, Ulozto or Mega)
b) start Flashtool and click on BLU button on the top
b) start Flashtool and click on BLU button on the top
c) turn off your phone and when Flashtool shows pop up window, connect phone to PC with holding volume down button
d) just click on relock button and your bootloader is locked for now.FOR MORE INFORMATION VISIT:-
http://xperiafirmware.com/8-firmware/72-sony-xperia-e3-dual-d2212
if you have any query....ask me in comment column
http://xperiafirmware.com/8-firmware/72-sony-xperia-e3-dual-d2212
if you have any query....ask me in comment column
Available link for download
Tuesday, September 6, 2016
What is ROM and How to Choose Perfect ROM For My Android Device
What is ROM and How to Choose Perfect ROM For My Android Device

You’ve been with your no-longer-so-brand-new Android phone for a long time now. It has become slow, there are apps that are no longer compatible with your operating system version and widgets and do not convey any emotion.
If your phone was a PC, you would have formatted and installed latest operating system. Same thing goes with Android, where you have to install ROM on device.
What is an Android ROM? What about firmware?
Firmware and ROM are one and the same thing: Read-only memory on your phone, can be said to be Soul of your Phone. Contains the Google Android operating system, duly adapted and configured to work with the hardware-specific mobile phone (antenna, computer graphics, cameras, etc.).
The operating system is in a read-only memory for two reasons: to prevent overwriting files, and to keep you faithful to small changes and integrated applications that manufacturers often include in their models. Being open source, Android allows for all sorts of modifications. In addition to the official ROM, very common thing you find is ROM made ??by groups of volunteers and enthusiasts who take the code base and add or remove features or skins. Even you yourself can create (cook) yours.
So why should I change the ROM?
For the same reason you changed your phone, whatever. Some people need more performance, who want to upgrade the operating system to a later version without waiting for official update, and who wants to renew the look of your phone or just try new things.
Is it Dangerous? Can Anything go Wrong?
No. Generally nothing happens as long as we follow the steps given correctly. Chances are new ROM may wipe out user data so, take backup (Titanium Backup is recommended). Or it may happen that some of your apps aren’t compatible with new ROM so, there are always alternatives to choose from million in Android Market.
Bricking of Phone (Phone actually becomes no more than a brick) is an extreme case which results out of carelessness and improper following of instructions.
How to flash a ROM?

Step 1. Install ROM Manager
Your Phone needs to be rooted, the next step is to install ROM Manager, a great app that lets you download and flash new ROM and change the recovery (recovery mode of mobile) with ClockworkMod, from which it is possible to perform full backups and delete the phone memory, among many other things.
Step 2. Install the recovery ClockworkMod
To install ClockWorkMod Recovery, Press the menu option in the ROM Manager. After downloading the image with the latest version of recovery, the app will ask you to restart the phone in recovery mode. From Recovery Mode, you can get back to normal mode with Reboot option.
Step 3. Flash ROM
ROM Manager has another important feature of installing ROM from SD Card. You generally have to download Custom ROM provided by developer and insert that ZIP file into root directory of SD card and then flash it.
How to Choose Perfect Android ROM
There is nothing like Perfect ROM but still, choosing a ROM for your Android phone is not a simple matter. Before flashing a note the following:
- Compatibility with your device (model, manufacturer and country)
- Presence of your favorite apps (HTC Sense, Google apps, etc.).
- If you need external partition (A2SD) or installed into the memory
- User Comments and Review about them
.
Some popular ROMs available are:
- CyanogenMod, the best known and with support for most brands
- MIUI, a spectacular ROM for Samsung, LG, Motorla and HTC
- LeeDroid , HTC mobile for fans of HTC Sense
There are many more, some more stable than others. All bring something, but the choice is up to you. You can always browse XDA Forums to find the one for yourself.
Available link for download
INFINIX X552 ZERO 3 XUI updated to 1 Z 3 2 Download Now
INFINIX X552 ZERO 3 XUI updated to 1 Z 3 2 Download Now

Note: If you haven’t rooted your device before, and you still have your stock recovery in place, you can download the OTA or TCard version and flash through recovery. But if your device is rooted and you have TWRP recovery install on your device, then it’s advisable you use SP Flash to flash the rom
1. XUI updated to 1.Z.3.2.
2. Added gyroscope function.
3. Added screen recording function.
4. Added weather app.
5. Added shutdown confirm option.
6. Optimized mobile overheating during charging.
7. Improved system stability and performance.
For X552-A1-L-20160330
Download OTA here
TCard Version here
SP Flash XFlashTool-X552-H952-A1-L-20160330.rar learn how to flash it here
For X552-B1-L-20160330
Download OTA here
TCard Version here
SP Flash X552-H952-B1-L-20160330.rar learn how to flash it here
Available link for download
Samsung Galaxy Note 6 “Lite” Rumored To Come WIth 4GB RAM
Samsung Galaxy Note 6 “Lite” Rumored To Come WIth 4GB RAM
Samsung Galaxy Note 6 “Lite” Rumored To Come WIth 4GB RAM Samsung Galaxy Note 6 will be pretty expensive and Samsung already has a cheaper alternative for those who may not be able to afford it. According to rumors, there will be a ‘Lite’ version of the device and the specifications can pass for a flagship. Although certain features will be removed to make it less expensive, the device still looks good on paper.

Samsung Galaxy Note Lite will still retain the 5.8? screen but the resolution is said to be 1080p. Also, instead of 8GB RAM, the device will sport “only” 4GB RAM. It is rumored to come with Qualcomm Snapdragon 820.
As reported last month, the real Samsung Galaxy Note 6 might ship with Qualcomm Snapdragon 823 clocked at 3.0GHz and a whopping 8GB RAM is said to be onboard. The device will feature a QHD display on its 5.8-inch screen And there are speculations tthe device will come with iris scanner.
At the moment, Samsung is yet to give an hint and nothing is official yet. These are rumors that cannot be totally believed but still, that doesn’t mean they should be completely discarded. However, nothing is certain until the device is actually released later this year.
Available link for download
How to stop cell broadcast ETWS messages and notifications in android mobiles
How to stop cell broadcast ETWS messages and notifications in android mobiles
Hi guys..recently I have faced a problem in my friend mobile lenova a7000. In which the network provider gives lot of ETWS cell broadcast messages. It annoys lot.
First ETWS stands for is Earthquake Tsunamis Warning Messges which provided by Network provider.
You can disable these notification via following steps
1. Open Message app in your mobile
2. Open Message settings
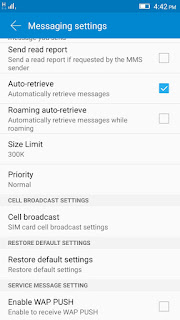
3. Just locate the cell broadcast option in the message settings.
4. Click on cell broadcast which is shows which provider gives the ETWS messages. Just click on that.
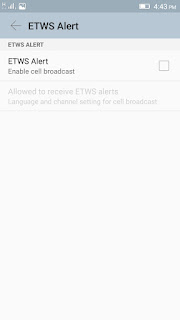 5. Now just untick the ETWS alerts.
Thats it..
Now you would not receive any type of broadcast messages.
Note: The steps may be varied in other mobile. But its almost locate in message settings only.
First ETWS stands for is Earthquake Tsunamis Warning Messges which provided by Network provider.
You can disable these notification via following steps
1. Open Message app in your mobile
2. Open Message settings
3. Just locate the cell broadcast option in the message settings.
4. Click on cell broadcast which is shows which provider gives the ETWS messages. Just click on that.
Thats it..
Now you would not receive any type of broadcast messages.
Note: The steps may be varied in other mobile. But its almost locate in message settings only.
Available link for download
How to Root Sony Xperia Z1 C6902 C6903 C6906 C6943 4 2 2 Jelly Bean Build 14 1 G 1 534
How to Root Sony Xperia Z1 C6902 C6903 C6906 C6943 4 2 2 Jelly Bean Build 14 1 G 1 534
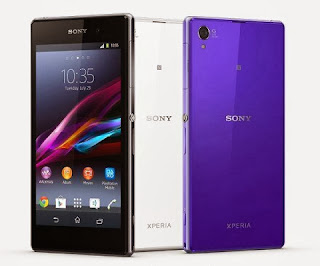
Root Your Sony Xperia Z1 Running Jelly Bean 4.2.2 Build number 14.1.G.1.534. This works on Locked Bootloader as well as Unlocked Bootloader. All the images used in the tutorial are not mine , I have used images by krabappel2548 , special thanks to him and the Chinese who have made the software vRoot , which we will using to root the phone.
This tutorial is for Xperia Z1 running Jelly Bean 4.2 Build number 14.1.G.1.534.
Disclaimer : I am not responsible if you brick your phone or if u make any other damage to your phone, you have been warned.
So Lets Start :
1. First make sure you are running Jelly Bean 4.2.2 Build 14.1.G.1.534. Go to Settings > About to verify this.
2. Enable USB Debugging , Go to Settings > About phone and tap 7 times on Build number to enable Developer options, now Go to Settings > Developer options to enable Enable USB debugging mode.
3. Enable Unknown Sources. Go to Settings > Security and check Unknown sources.
4. Download vRoot from here - http://www.mgyun.com/vroot
Yeah it is in Chinese, so bear with it :P , download it and install this software just click next next like u install any other software :P
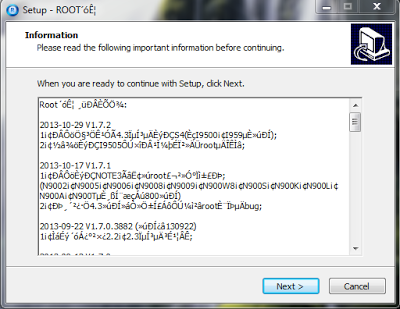
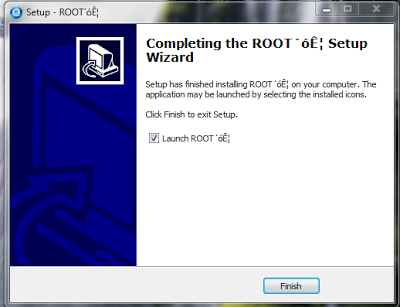
5. Open the vRoot (ROOT´óʦ , this will be the name of the program) and Connect your data cable to your phone and PC , you will see a green Root icon in vRoot, click on that to start the rooting process. See the below screenshot.
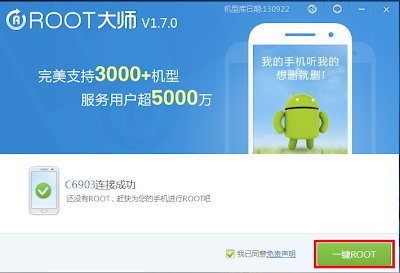
6. When it is finished your phone will restart automatically and vRoot will show something like the below screenshot.
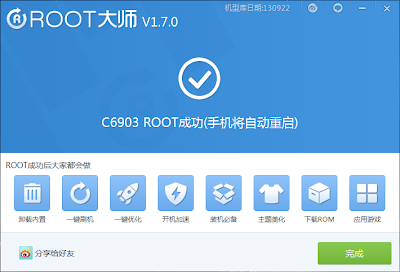
7. Congratulations your phone is now rooted . To verify see the Kinguser app , see the note below to replace it with SuperSU.
Note :- If you want to change the Kinguser (Chinese Superuser app) to SuperSU , Download this File - LINK. Extract it somewhere , and run runme_win.bat. Kinguser will change to SuperSU.
OR
If you want to change the Kinguser (Chinese Superuser app) to SuperSU , just download SuperSU from Playstore , open it , it will ask for Root Permissions , grant it , then follow the screen instructions to update the binary. Now open SuperSU , go to Settings and click on "Install SuperSU into /system" . Your phone will reboot and Kinguser will automatically get uninstalled :)
Note : This method works on both locked and unlocked bootloader devices!!!
If you have any problems feel free to comment.
Source - XDA
Available link for download
Monday, September 5, 2016
Galaxy S4 Proves To Be Rough And Tough In Variety Of Stress Tests Official Video
Galaxy S4 Proves To Be Rough And Tough In Variety Of Stress Tests Official Video
When looking into purchasing a new smartphone, consumers look at a wide range of variables before making a final decision. This can vary from person to person, with some looking for a great camera and high quality display, while others are more focused on longevity, with removable batteries and microSD expansion. Whatever your personal points of consideration may be, most of us can unite on the fact that we want our devices to be able to withstand the day-to-day wear and tear it will inevitably go through. If you are considering a purchase of the hottest property in the mobile industry right now, the Samsung Galaxy S4, will surely want to know whether it can hold its own in the big bad world, and the video stress test below gives a general idea of how rugged the current darling of the Android space is when faced with various situations.
Of course, the best course of action anybody can take upon the purchase of a new smartphone is to pay out for a decent, reputable and protective case. But even then, it’s a last line of defense rather than a failsafe, and as such, it’s nice to have a general idea in advance of how tough your beastly new smartphone will be when you take it into the wild.

The stress tests are provided officially by Samsung, so by default, cannot be classed as strictly objective. However, it doesn’t look like the testing techniques have been rigged to flatter the company’s flagship handset, so the fact that it performed rather well after being dropped, smashed, submerged in water, and placed in other situations that would send a chill down our spines as owners, is neither here nor there.
If you’re looking for a Galaxy S4 that can really hold its own, you may want to consider the Samsung Galaxy S4 Active, which is both waterproof and dust-proof.

Check out the full video clip of the Galaxy S4 being put through its paces below. The video is in Korean, so you mightn’t understand what is being said, but a scene of a smartphone being placed into a walnut cracker really doesn’t require much by way of commentary.
Noticed how the phone was running stock Android in some places?
Available link for download
Sunday, September 4, 2016
New SMS Notification Android App to Get Pop Up on Android Screen
New SMS Notification Android App to Get Pop Up on Android Screen
Getting instant access to incoming SMS without making a single touch is easy nowadays. There are many free SMS apps that replaces the default Android SMS and provides you with advanced features like SMS preview and Privacy. If you are already using apps like Go SMS, Handcent SMS etc. Then there is no need to look further. But if you still prefer using android stock SMS app, the only option you have is to have the new SMS scroll on the notification bar. This is bit inconvenient and you will have to get into messaging app to read the message properly.
To be true, personally I have never used SMS preview feature as it will be a big hindrance to your privacy. The situation turns awkward when your friends are having your phone and a private message pops up. If you do not care about that privacy you can go for SMS Notification Popup.
SMS Notification Popup is free and light weight app. You can easy configure and use it instantly after installation. Let’s see how this app works.
Working With SMS Notification Popup

Open the app and select your preferences. There are two themes: light and dark. The popup display can be further customized by position and the content to be displayed. You can select to have only contact, message or both to be displayed on popup. Most importantly, you can set the time for which the popup will be displayed.

One thing to keep in mind is that, you should disable Stock SMS notification if you are using popup notification. There is no problem if you don’t, you will only get double notification for a single SMS. To disable default SMS notification, open the messaging app and go to settings. Un check the notifications option.With SMS Notification popup it becomes a blaze to read new messages for Android stock SMS app users. The only thing I felt like missing was the ability to read the message within SMS app after tapping on the popup. Tapping the popup does nothing. Well, that’s not a big issue and the feature might get added in future versions.
Available link for download
HOW TO GET 500MB FOR JUST 25 ON MTN SIM
HOW TO GET 500MB FOR JUST 25 ON MTN SIM
If you like to download with your mtn siim @ night
Mtn as roll out free night sub,
How Can I Get MTN 500MB for #25?
It is pretty simple, just do the below;
Migrate to MTN iPulse if you are not already there by dialing *406#


“Dear customer, you have successfully subscribed to Free Night Browsing between 00:00 and 04:00. N25 has been deducted from your account"
Note: this plan is usable only within 12am – 4am.
you can’t accumulate and Subscribe for it again when U exhaust the first 500MB untill nextday
If you have more than 1 MTN sim, with just N100, you have 2GB staring at you dailing
You can also get 1gb with just #500 with this plan
by dialing *406# to get yours
Mtn as roll out free night sub,
How Can I Get MTN 500MB for #25?
It is pretty simple, just do the below;
Migrate to MTN iPulse if you are not already there by dialing *406#
Make sure you have minimum of N30 in your phone
Send NIGHT to 131 via SMS
Send NIGHT to 131 via SMS
You’ll get a message like this
Note: this plan is usable only within 12am – 4am.
you can’t accumulate and Subscribe for it again when U exhaust the first 500MB untill nextday
If you have more than 1 MTN sim, with just N100, you have 2GB staring at you dailing
You can also get 1gb with just #500 with this plan
by dialing *406# to get yours
Available link for download
Subscribe to:
Posts (Atom)