Showing posts with label g. Show all posts
Showing posts with label g. Show all posts
Thursday, September 8, 2016
Tuesday, September 6, 2016
How to Root Sony Xperia Z1 C6902 C6903 C6906 C6943 4 2 2 Jelly Bean Build 14 1 G 1 534
How to Root Sony Xperia Z1 C6902 C6903 C6906 C6943 4 2 2 Jelly Bean Build 14 1 G 1 534
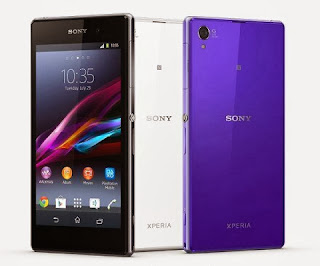
Root Your Sony Xperia Z1 Running Jelly Bean 4.2.2 Build number 14.1.G.1.534. This works on Locked Bootloader as well as Unlocked Bootloader. All the images used in the tutorial are not mine , I have used images by krabappel2548 , special thanks to him and the Chinese who have made the software vRoot , which we will using to root the phone.
This tutorial is for Xperia Z1 running Jelly Bean 4.2 Build number 14.1.G.1.534.
Disclaimer : I am not responsible if you brick your phone or if u make any other damage to your phone, you have been warned.
So Lets Start :
1. First make sure you are running Jelly Bean 4.2.2 Build 14.1.G.1.534. Go to Settings > About to verify this.
2. Enable USB Debugging , Go to Settings > About phone and tap 7 times on Build number to enable Developer options, now Go to Settings > Developer options to enable Enable USB debugging mode.
3. Enable Unknown Sources. Go to Settings > Security and check Unknown sources.
4. Download vRoot from here - http://www.mgyun.com/vroot
Yeah it is in Chinese, so bear with it :P , download it and install this software just click next next like u install any other software :P
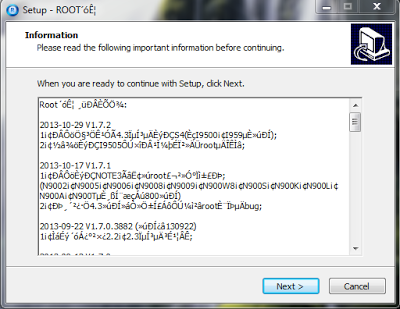
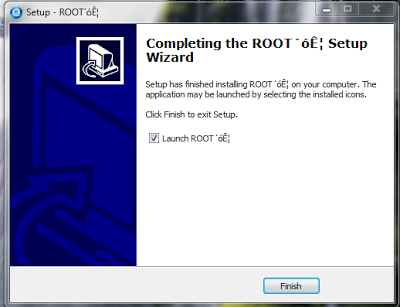
5. Open the vRoot (ROOT´óʦ , this will be the name of the program) and Connect your data cable to your phone and PC , you will see a green Root icon in vRoot, click on that to start the rooting process. See the below screenshot.
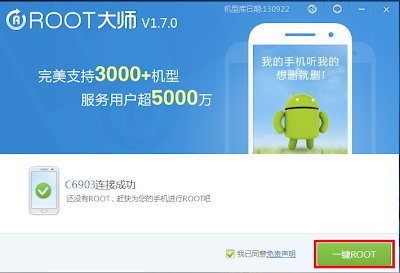
6. When it is finished your phone will restart automatically and vRoot will show something like the below screenshot.
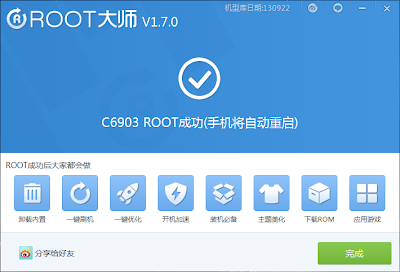
7. Congratulations your phone is now rooted . To verify see the Kinguser app , see the note below to replace it with SuperSU.
Note :- If you want to change the Kinguser (Chinese Superuser app) to SuperSU , Download this File - LINK. Extract it somewhere , and run runme_win.bat. Kinguser will change to SuperSU.
OR
If you want to change the Kinguser (Chinese Superuser app) to SuperSU , just download SuperSU from Playstore , open it , it will ask for Root Permissions , grant it , then follow the screen instructions to update the binary. Now open SuperSU , go to Settings and click on "Install SuperSU into /system" . Your phone will reboot and Kinguser will automatically get uninstalled :)
Note : This method works on both locked and unlocked bootloader devices!!!
If you have any problems feel free to comment.
Source - XDA
Available link for download

Friday, August 26, 2016
CARA FLASH MOTOROLA MOTO G 2nd Gen
CARA FLASH MOTOROLA MOTO G 2nd Gen
CARA FLASH MOTOROLA -MOTO G 2nd Gen
Untuk Firmwarenya
untuk firmware lengkapnya

UNTUK LANGKAH-LANGKAHNYA
1. Download RSD LITE SOFTWARE
2. Download Firmware yang sesuai
3. Instal RSD LITE SOFTWARE
4. Instal Patch file RSD LITE SOFTWARE
5. Sekarang saat nya Flashing HP nya
6. Jalankan RSD LITE SOFTWARE
7. Kemudian Klik menu “Config”
8. Klik Switch to MTK
9. Sambungkankan HP motorola yang akan di
Untuk Firmwarenya
untuk firmware lengkapnya
UNTUK LANGKAH-LANGKAHNYA
1. Download RSD LITE SOFTWARE
2. Download Firmware yang sesuai
3. Instal RSD LITE SOFTWARE
4. Instal Patch file RSD LITE SOFTWARE
5. Sekarang saat nya Flashing HP nya
6. Jalankan RSD LITE SOFTWARE
7. Kemudian Klik menu “Config”
8. Klik Switch to MTK
9. Sambungkankan HP motorola yang akan di
Flash via Kabel Data
10. Sambungkan dengan mode Port Mode bukan Mass Storrage ya
11. Bila tidak terdeteksi Hp nya maka coba lagi Instal driver Hp nya
12. Sekarang klik “Browse” file yang berformat (.mzf) yang sudah kalian downlod
13. Matikan HP, kemudian lepaskan Battere dan kabelnya
14. Lalu konekan cabel ke HP, kemudiaan tekan volume bagian bawah, masukan battere dan nyalakan..ingat jangan melepaskan volume down sebelum muncul type Hp di RSD LITE nya
15. Langkah no 14 ini hanya untuk mendeteksi hp pada progra RSD LITE nya nanti akan muncul type software HP pada No 1 di RSD LITE
16. Bila flashing pada no satu tidak berjalan otomatis maka klik star, di tombol atas dan tunggu sampai 100%
17. Bila sudah sekarang lepaskan Hp dan nyalakan
18. Langkah selanjutnya adalah klik “browse” dan carilah file yang berformat (.hs) lalu open
19. Sambungkan Hp dengan mode Port Mode
20. Lalu klik tombol start
21. Tunggu sampai selesai setelah selesai maka HP akan otomatis menyala
22. lalu tekan *#8375# untuk melihat versi software
23. SELESAI
10. Sambungkan dengan mode Port Mode bukan Mass Storrage ya
11. Bila tidak terdeteksi Hp nya maka coba lagi Instal driver Hp nya
12. Sekarang klik “Browse” file yang berformat (.mzf) yang sudah kalian downlod
13. Matikan HP, kemudian lepaskan Battere dan kabelnya
14. Lalu konekan cabel ke HP, kemudiaan tekan volume bagian bawah, masukan battere dan nyalakan..ingat jangan melepaskan volume down sebelum muncul type Hp di RSD LITE nya
15. Langkah no 14 ini hanya untuk mendeteksi hp pada progra RSD LITE nya nanti akan muncul type software HP pada No 1 di RSD LITE
16. Bila flashing pada no satu tidak berjalan otomatis maka klik star, di tombol atas dan tunggu sampai 100%
17. Bila sudah sekarang lepaskan Hp dan nyalakan
18. Langkah selanjutnya adalah klik “browse” dan carilah file yang berformat (.hs) lalu open
19. Sambungkan Hp dengan mode Port Mode
20. Lalu klik tombol start
21. Tunggu sampai selesai setelah selesai maka HP akan otomatis menyala
22. lalu tekan *#8375# untuk melihat versi software
23. SELESAI
Available link for download
Thursday, August 25, 2016
CARA FLASH LG G VISTA VS880 VRZ VIA SP FLASHTOOL
CARA FLASH LG G VISTA VS880 VRZ VIA SP FLASHTOOL
Untuk cara flashing LG G VISTA VS880 VRZ
Seperti biasa flashtool atau cara flash untuk handphone khususnya LG G VISTA VS880 VRZ

Seperti biasa flashtool atau cara flash untuk handphone khususnya LG G VISTA VS880 VRZ
Dengan kerusakan handphone seperti :
bootloop , hardbrick, layar handphone hang dll.
untuk memudahkan anda mengeflash ada baiknya baterai terisi 80-90 saja agar proses pengeflashan anda berjalan dengan sampai dengan selesai.
untuk memudahkan anda mengeflash ada baiknya baterai terisi 80-90 saja agar proses pengeflashan anda berjalan dengan sampai dengan selesai.
- Stock rom (file kdz)resmi LG G VISTA VS880 VRZ klik disini
- LG G VISTA VS880 VRZ driver usb klik disinil
- LG KDZ FLASTOOL disini
- LG UNITED MOBILE DRIVE klik disini
- Ambil Stock Rom (file kdz)LG G VISTA VS880 VRZ
- Ambil LG G VISTA VS880 VRZ DRIVER KDZ USB
- Ambil dan extrakLG G VISTA VS880 VRZ KDZ Via Flashtool
- All Stock Rom Fimware LG G VISTA VS880 VRZ
- RUN LG KDZ Flashtool Exe.
- Pilih jenis CDMA
- Telepon mode DIAG
- di bagian kdz arahkan ke stock fimware yang di download
- matikan hp LG G VISTA VS880 VRZ dan cabut bateri lalu pasang kembali
- masuk ke unduh modus volume tekan di fferences+power sambungkan kaber usb dari komputer
- biarkan hingga LG bertuliskan fimware update dan komputer mengenalin perangkat LG G VISTA VS880 VRZ
- KLIK mulai untuk proses Flashing berjalan...
- Proses Flasing LG G VISTA VS880 VRZ bisa memakan waktu sekitar 20 menit,jika terdapat tulisan finis atau centang berwarna hijau dari LG Flasing tersebut berarti menendapakan hp anda siap dan normal kembali dan tidak lupa mencabut kabel usb dari komputer yang telah memflasing hp LG G VISTA VS880 VRZ .matikan hp tersebut dan hidupkan kembali......
- Ambil Stock Rom (file kdz)LG G VISTA VS880 VRZ
- Ambil LG G VISTA VS880 VRZ DRIVER KDZ USB
- Ambil dan extrakLG G VISTA VS880 VRZ KDZ Via Flashtool
- All Stock Rom Fimware LG G VISTA VS880 VRZ
- RUN LG KDZ Flashtool Exe.
- Pilih jenis CDMA
- Telepon mode DIAG
- di bagian kdz arahkan ke stock fimware yang di download
- matikan hp LG G VISTA VS880 VRZ dan cabut bateri lalu pasang kembali
- masuk ke unduh modus volume tekan di fferences+power sambungkan kaber usb dari komputer
- biarkan hingga LG bertuliskan fimware update dan komputer mengenalin perangkat LG G VISTA VS880 VRZ
- KLIK mulai untuk proses Flashing berjalan...
- Proses Flasing LG G VISTA VS880 VRZ bisa memakan waktu sekitar 20 menit,jika terdapat tulisan finis atau centang berwarna hijau dari LG Flasing tersebut berarti menendapakan hp anda siap dan normal kembali dan tidak lupa mencabut kabel usb dari komputer yang telah memflasing hp LG G VISTA VS880 VRZ .matikan hp tersebut dan hidupkan kembali......
Available link for download
Wednesday, August 24, 2016
How to install TWRP recovery of the Moto G
How to install TWRP recovery of the Moto G
How to install TWRP recovery of the Moto G - Just recently saw the launch of Android 4.4.2 KitKat for the Moto G, an official update is available OTA (Over the Air) and can be installed in the American variant of this model, but for those with the European variant or international, will have to wait a few more weeks as the update is coming. However, it is possible to enjoy the upgrade through a manual process, ie by installing the ROM.

That if, as you know those who follow these pages, to install any ROM from recovery and we do so we must get unlock the bootloader, a step that we saw a few days ago. Lets see how to install the recovery of TWRP in the Moto G, so be ready to install a custom ROM with which we can enjoy several improvements that developers added.
The first step is to download the file containing the recovery, which we do from this link, or from this one. We keep it in a folder on our PC, making sure your name is recovery.img (without the quotes, of course). Now, we open a terminal window or system (Windows) and we have to run the following command, assuming fastboot tools which have already been installed to unlock the bootloader- are in the system path.
fastboot flash recovery recovery.img
The process is very fast, it does not take more than about 30 seconds at most, and at the end we will have installed TWRP recovery of the Moto G, which has gained much popularity in recent years thanks to being tactile buttons and thus big enough streamline the use of this part so important in using ROMs, kernels, Nandroids and formatting partitions.
Available link for download
Tuesday, August 23, 2016
CyanogenMod 13 ANDROID M Available For Moto G 2014
CyanogenMod 13 ANDROID M Available For Moto G 2014
CyanogenMod 13 (ANDROID M) Available For Moto G 2014 - After a month of his arrival we are seeing Android Marshmallow is coming officially as in the example of corena version of LG G4 already received the OTA or unofficially as OnePlus One who joins the devices they version arrives through a custom ROM, in this case OmniRom.
Gradually the siege Android M gets support from the scene it grows larger. Today we will present CyanogenMod 13 for the second version of G. Moto rompeventas
Android Moto G Marshmallow for 2014 comes thanks to CyanogenMod 13
For users of this device it is going to be a pleasure to know that one of the best in custom ROM has reached its latest version. As we know, the CM version 13 is based on Android Marshmallow so slowly and with each version will have all the features on our Moto G. M

Because it is a very early version still we have basic functions CM malfunctioning, but according to reports reaching the media is continuously slowly fixing these bugs.
Link Videos : Youtube
In the video that we have left so that you can see which are certainly bugs that now owns this version, we see an added feature of Android M extremely useful and that other versions and had to resort to third root to perform this action . We are talking about the passage of applications and data from internal memory to memory microSD.
We leave the direct link to the download version of the CM 13 and the gapps so you can try this new version. The official XDA thread will also leave you so you can continue to see the development and potential bugs that will be found. To enjoy!
CyanogenMod 13 Moto G 2014
gapps
Official XDA thread
Available link for download
Monday, August 22, 2016
All about G phone D16 Atom official firmwere last update
All about G phone D16 Atom official firmwere last update

Password free : hasemesuk@yahoo.com
www.GsmHase.com

Available link for download
Wednesday, August 17, 2016
rk2928 G Tab Firmwares SW I30 V033
rk2928 G Tab Firmwares SW I30 V033

A 7.5inch tab-1024x720 resolution
A Rom info :
A SW_I30_V033.rar
A DOWNLOD HERE
Available link for download
Sunday, August 14, 2016
CyanogenMod 13 Unofficial Moto G 3rd Generation
CyanogenMod 13 Unofficial Moto G 3rd Generation
Weekly selection
This week we have chosen to update the ROM to the rompeventas Moto G 3rd Generation and bring Android 6.0 as CyanogenMod 13. As we know the new version of CyanogenMod is based on Android 6.0 Marshmallow.
Unofficial CyanogenMod 13
Thanks to the XDA community have before it officially arrives, adapting Android Marsmallow for this device. Later we will see what kind of features are still in development, but first lets look at the requirements of the installation.

Requirements for installation
Like any version of CyanogenMod, we will download the pack of gapps we want to get the experience of all applications of Google Play. Heres the link, well just choose our architecture, in our case 64 bits, the Android 6.0 version and gapps pack you want.
Link gapps (we recommend the Micro pack)
Link Builds (choose the most updated)
Of course to complete these steps need root permissions and custom recovery as TWRP.
First steps
For installation of the ROM need to follow these steps:
- After downloading the .zip and gapps that flasheamos, we will save on the external microSD card because when you delete the internal memory wipe and making our data safely we pass to step 2.
- Well, now, through an application or activation buttons recovery, the smartphone will restart in recovery mode.
- Once inside the recovery, in our case, we recommend using TWRP, we will make a full wipe (if we repeat the process, the better).
- After the install option by zip, we choose our microSD card the downloaded ROM file. Installation and wait to pass to the next step.
- Now in the same section of the .zip find gapps we download and store on the microSD and install. (If you do not install the gapps Google Play we will not have to run our smartphone 100%).
- Once installed, access to the menu to reboot and restart the system.
After this installation in case we were in CyanogenMod version 12, we recommend not downgrade directly to version 12 back. Thus we would have to do a full Wipe, as these ROMs work best with a clean install.
Possible errors found in this ROM
The developer of this ROM in its first release warned the bugs that were found but with our updates errors that remain are:
- Some functions do not work CyanogeMod official.
- In landscape mode you may have some visual bug.
In the beginning there are still many more errors but it seems the developer has been stepping up and brings a new update every week fixing and bringing some functions that were lost.
LED Will we?
Marshmallow Android came with good news for the users of this device. This new version we return LED operation.
There are no news and this latest version does not yet work, but hopefully this developer joins LED testing this device and we bring its functionality for new updates.
Ready to test the functions of Android M
This is where your work begins. This ROM brings many new features, including the principal "Doze" that allows us to manage battery consumption with more precision in our smartphone. To enjoy!
In this case we leave that investiguéis this new ROM and its new features. In addition we will leave the link of official development thread of this ROM to observe their development.
Next week we will bring you the Official version of CyanogenMod 13 for LG G3, our favorite device.
A greeting!
Available link for download
Saturday, August 13, 2016
G Tide G19 4 4 2 Flash File 10000 test Download With Out Password
G Tide G19 4 4 2 Flash File 10000 test Download With Out Password

Download Here Click Here
Available link for download
Thursday, August 11, 2016
K0706b V2 5 mt6572 G Tide G19 4 4 2 firmware test Free Download
K0706b V2 5 mt6572 G Tide G19 4 4 2 firmware test Free Download

Download Here
Download Here 2
Available link for download
Subscribe to:
Posts (Atom)