Showing posts with label c6903. Show all posts
Showing posts with label c6903. Show all posts
Thursday, September 8, 2016
Sony Xperia Z1 LTE C6903 Lollipop 5 1 1 official Tested firmware
Sony Xperia Z1 LTE C6903 Lollipop 5 1 1 official Tested firmware
download latest official firmware for Sony Xperia Z1 LTE C6903 lollipop 5.1.1

download link:
https://docs.google.com/uc?id=0ByxbVOOPbJakTmNWOUNRMzg5S2s&export=download
Available link for download

Tuesday, September 6, 2016
How to Root Sony Xperia Z1 C6902 C6903 C6906 C6943 4 2 2 Jelly Bean Build 14 1 G 1 534
How to Root Sony Xperia Z1 C6902 C6903 C6906 C6943 4 2 2 Jelly Bean Build 14 1 G 1 534

Root Your Sony Xperia Z1 Running Jelly Bean 4.2.2 Build number 14.1.G.1.534. This works on Locked Bootloader as well as Unlocked Bootloader. All the images used in the tutorial are not mine , I have used images by krabappel2548 , special thanks to him and the Chinese who have made the software vRoot , which we will using to root the phone.
This tutorial is for Xperia Z1 running Jelly Bean 4.2 Build number 14.1.G.1.534.
Disclaimer : I am not responsible if you brick your phone or if u make any other damage to your phone, you have been warned.
So Lets Start :
1. First make sure you are running Jelly Bean 4.2.2 Build 14.1.G.1.534. Go to Settings > About to verify this.
2. Enable USB Debugging , Go to Settings > About phone and tap 7 times on Build number to enable Developer options, now Go to Settings > Developer options to enable Enable USB debugging mode.
3. Enable Unknown Sources. Go to Settings > Security and check Unknown sources.
4. Download vRoot from here - http://www.mgyun.com/vroot
Yeah it is in Chinese, so bear with it :P , download it and install this software just click next next like u install any other software :P
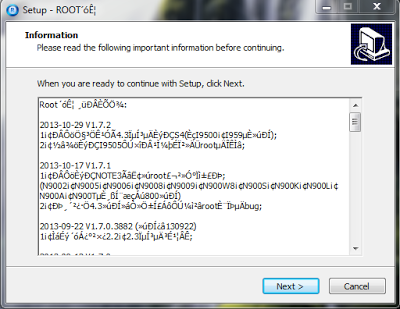
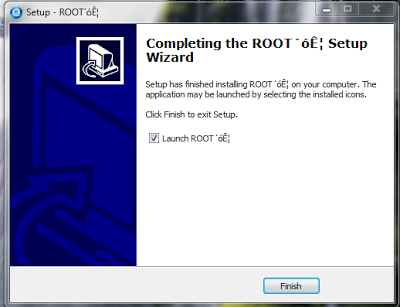
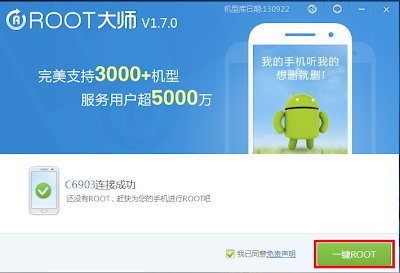
5. Open the vRoot (ROOT´óʦ , this will be the name of the program) and Connect your data cable to your phone and PC , you will see a green Root icon in vRoot, click on that to start the rooting process. See the below screenshot.
6. When it is finished your phone will restart automatically and vRoot will show something like the below screenshot.
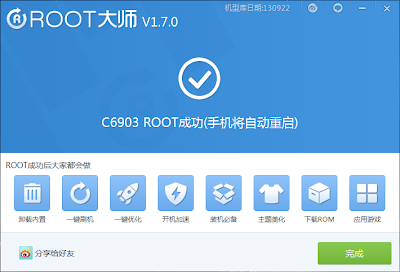
7. Congratulations your phone is now rooted . To verify see the Kinguser app , see the note below to replace it with SuperSU.
Note :- If you want to change the Kinguser (Chinese Superuser app) to SuperSU , Download this File - LINK. Extract it somewhere , and run runme_win.bat. Kinguser will change to SuperSU.
OR
If you want to change the Kinguser (Chinese Superuser app) to SuperSU , just download SuperSU from Playstore , open it , it will ask for Root Permissions , grant it , then follow the screen instructions to update the binary. Now open SuperSU , go to Settings and click on "Install SuperSU into /system" . Your phone will reboot and Kinguser will automatically get uninstalled :)
Note : This method works on both locked and unlocked bootloader devices!!!
If you have any problems feel free to comment.
Source - XDA
Available link for download
Friday, August 26, 2016
How to Root Sony Xperia Z1 C6902 C6903 C6906 C6943 4 4 4 KitKat Build 14 4 A 0 157
How to Root Sony Xperia Z1 C6902 C6903 C6906 C6943 4 4 4 KitKat Build 14 4 A 0 157

Sony released a new update for Xperia Z1 Build 14.4.A.0.157 with some bug fixes aand here is the tutorial to root the latest firmware :D . This tutorial is only for Build 14.4.A.0.157 , will work on all models of Xperia Z1 i.e C6902, C6903, C6909, C6943 :)
To Root any older Build version of Xperia Z1 CLICK HERE
Disclaimer : I am not responsible if you brick your phone or if u make any other damage to your phone
So Lets Start :
1. First make sure you are running KitKat 4.4.4 Build 14.4.A.0.157. Go to Settings > About to verify this. The below screenshot is of C6902 but the method will work on all models of Z1 running Build 14.4.A.0.157.
2. Download and install Flashtool from here - http://www.flashtool.net/downloads.php
3. Download these three files ( See this screenshot first - http://i.imgur.com/DgoqOIA.png )
- C690X_14.4.A.0.108_KernelOnly.ftf
- C690X_14.4.A.0.157_KernelOnly.ftf
- rootkitXperia_20140719.zip
5. Run Flashtool and Flash C690X_14.4.A.0.108_KernelOnly.ftf ( See the screenshots below ) Press Volume down button and connect your phone to connect in Flash Mode.


6. Close Flashtool ( DO NOT SKIP THIS STEP )
7. Boot your device , and Connect Your Device to PC with USB Debugging Mode On , go to Settings > Developer Options to enable it. Also Enable Unknown Sources. Go to Settings > Security and check Unknown sources.
8. Extract rootkitXperia_20140719.zip and execute install.bat , the rooting process will start and your device will reboot ( For more instructions on this step refer this - http://www.waledacdroid.com/2014/11/how-to-root-sony-xperia-z1-c6902-c6903.html )
9. Now Power Off your phone and Flash the C690X_14.4.A.0.157_KernelOnly.ftf using Flashtool. Press Volume Down button and connect your phone to PC to connect in Flashmode.

10. Wait for flashing to finish , disconnect your phone from PC and boot your phone.
THATS IT YOUR PHONE IS NOW ROOTED.
Note : This method works on both locked and unlocked bootloader devices!!!
If you have any problems feel free to comment :)
Available link for download
Wednesday, August 24, 2016
How to Root Sony Xperia Z1 running Android Lollipop 5 1 1 Build 14 6 A 1 236 C6902 C6903 C6906 C6943
How to Root Sony Xperia Z1 running Android Lollipop 5 1 1 Build 14 6 A 1 236 C6902 C6903 C6906 C6943
Root Xperia Z1 running Android Lollipop 5.1.1
Here is the tutorial to root your Sony Xperia Z1 running Android Lollipop 5.1.1 Build 14.6.A.1.236
This tutorial is for Build 14.6.A.1.236 and all older versions, will work on all models of Xperia Z1 i.e C6902, C6903, C6909, C6943. ( This tutorial can be used to root older versions also. )

Disclaimer : I am not responsible if you brick your phone or if u make any other damage to your phone
So Lets Start :
1. First make sure you are running Lollipop 5.1.1 Build 14.6.A.1.236 . Go to Settings > About to verify this. The below screenshot is of C6902 but the method will work on all models of Z1. ( Note : This method will work on all other older Android versions / builds also of Xperia Z1 like 14.6.A.1.216 or 14.6.A.0.368 )
2. Download KingRoot v4.81 and install it in your mobile - LINK
3. Open the KingRoot app from your mobile , Click on "Start Root" , the Rooting Process will start. ( You need to be connected to internet via WiFi or Mobile data


4. You will see a message saying "Successfully obtain root" when the process is finished.
THATS IT YOUR PHONE XPERIA Z1 IS NOW ROOTED.
To Replace KingUser with SuperUser follow the steps :
1. Download the file - Replace_Kinguser_with_SuperSU LINK
2. Extract the file and copy the mrw folder to the root of your internal storage.

3. Download Terminal Emulator for Android from PlayStore - https://play.google.com/store/apps/details?id=jackpal.androidterm&hl=en
4. Open the Terminal app in your mobile , enter the command " su " ( without quotes ) . Allow Root Access in your mobile.

5. Now run the command - " sh /sdcard/mrw/root.sh " ( without quotes )

6. The SuperSu app will launch automatically (if u see any errors just ignore) , it will ask to update binary , click on CONTINUE , then Select NORMAL method. After the Binary is installed it will ask to reboot your device.


Note : This method works on both locked and unlocked bootloader devices!!!
If you have any problems feel free to comment :)
Available link for download
Sunday, August 14, 2016
How to Install Android Lollipop 5 0 2 Build 14 5 A 0 242 on Sony Xperia Z1 C6902 C6903 C6909 C6943
How to Install Android Lollipop 5 0 2 Build 14 5 A 0 242 on Sony Xperia Z1 C6902 C6903 C6909 C6943
Sony has finally released the official update of Android 5.0.2 ( Build 14.5.A.0.242 ) on Sony Xperia Z1 , but it is yet to roll out in all the countries and devices. So if you are yet to receive the update and cannot wait , here is the method to update your Xperia Z1 to Android 5.0.2 Official
This tutorial is about installing Android 5.0.2 14.5.A.0.242 on Sony Xperia Z1
This tutorial is only for Sony Xperia Z1 ( C6902, C6903, C6909, C6943 ) . Do no flash this on any other phone like Z1 compact , etc.

Disclaimer : I am not responsible if you brick your phone or if u make any other damage to your phone
Step 1 : First of all download this ftf File from here - DOWNLOAD LINK OR You can create your own FTF - Tutorial Link
Step 2 :
- Download Flashtool from the official website - http://www.flashtool.net/downloads.php
- Install it on your PC using onscreen instructions. It will create a folder "Flashtool" in your drive (C:Flashtool)
- Now go to CFlastooldriversflastool-drivers.exe and click on it and install it after marking/checking "Flashmode drivers and Xperia Z1 Driver"
- Restart your PC

Note: Make sure you have USB debugging on. If not goto setting>developer options> and check USB debugging on
Step 3 : Now place the downloaded ftf ( from Step 1 ) file to C:/Flashtool/firmwares/
Step 4 : Now open Flashtool from the Start Menu
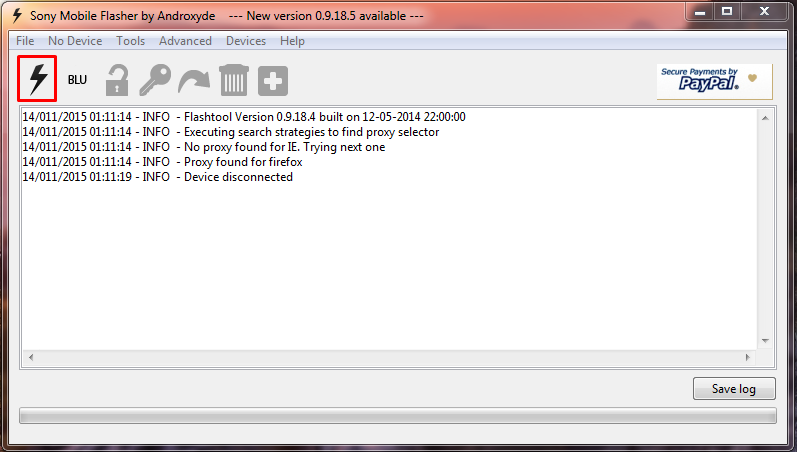
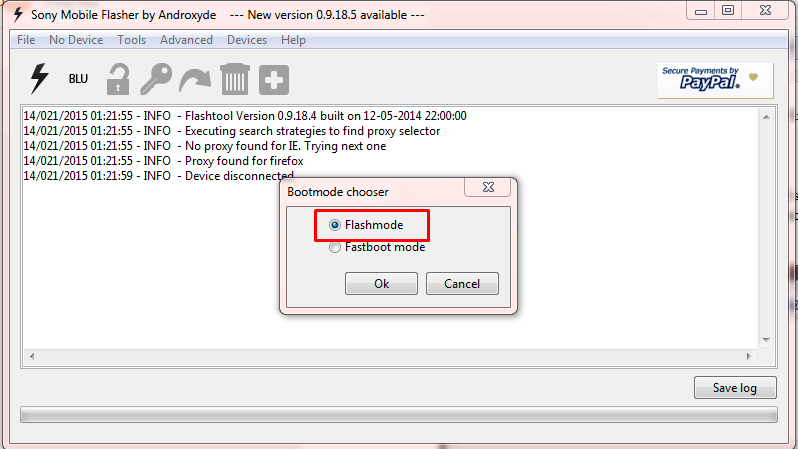
Step 5 : Now click on the FLASH icon of the flashtool which is on the left side of the iconic tab(below the file option-its like a lightning sign).a window will be opened Mode Selector. Check "FlashMode" and press "ok" button.
Step 6 : Now Select the Firmware file which you had placed in C:/Flashtool/firmwares/ in Step 3

Step 7 : Now Click on the Flash Button
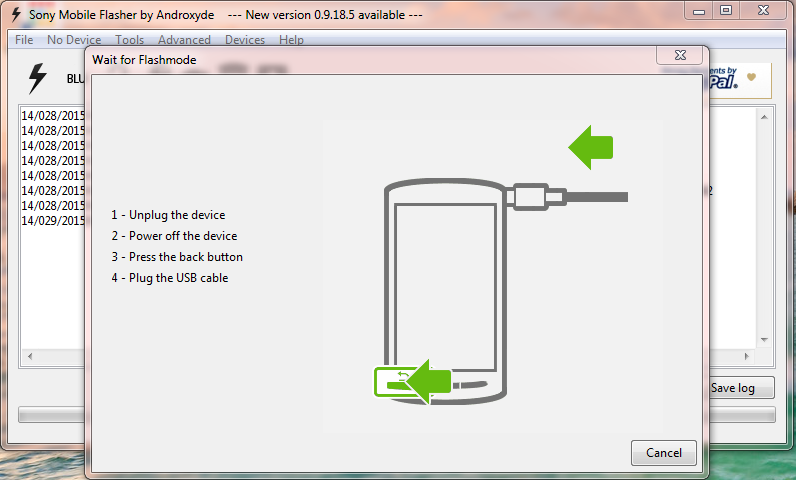
Step 8 : Now the flashtool will prepare files for flashing and then you will be prompted to connect phone in flashmode.
Step 9 :
- Now Power Off your phone and wait for 5 Seconds, then Connect your phone to PC using USB cable while pressing volume down button (-) (Make sure you dont release Volume down button until flashtool starts flashing)
- Flashtool will start flashing firmware it may take some time. ( Now u can release the volume down button )
- After flashing flashtool will prompt you to disconnect you phone. Discconet it and power on your phone (It may take some time for the first boot).
- Enjoy the Official Lollipop Android 5.0.2 on your Xperia Z1
Feel Free to Comment if you have any doubts ;)
Available link for download
Subscribe to:
Posts (Atom)