Showing posts with label install. Show all posts
Showing posts with label install. Show all posts
Friday, September 9, 2016
How to Install CM11 Nightly LG G3
How to Install CM11 Nightly LG G3
How to Install CM11 Nightly LG G3 - European users of the LG G3 began receiving the update to Android 5.0 Lollipop recently, but for those of us in other parts still have to wait. Unless we decide to try some of the excellent custom ROMs that this device has available, including of course one of the most interesting it is to CyanogenMod. Let us see how to install CyanogenMod 11 Nightly LG G3.
This is a ROM based on Android 4.4.4 KitKat AOSP, meaning that for now does not give us the same as Lollipop but has some of its features, and developers are already working on CM12, based on Android 5.0 .

Before you begin, as always we emphasize when performing these procedures, that it will be advisable to make a backup of all our critical data, or if we prefer a Nandroid back to our computer to the current situation if something we do not like. Also, before something like this it is necessary to charge the battery up to 60% or more, and finally we will need USB debugging enabled (that we do in development options).
Now if we can start:
- CM11 Nightly downloaded from this link and do the same with the gapps package from this other link.
- We connect the LG G3 to our PC via USB cable and copy both files to the internal storage.
- Disconnect the phone cable and turn it off.
- We waited a few seconds and turn it on in recovery mode.
- We wipe data, cache and Dalvik.
- We return to the initial screen of the recovery and select install zip from sdcard "and then" choose zip from sdcard. We choose the ROM file and confirm using the Power button.
- We wait a few seconds and repeat the process for archiving the gapps.
- We return to the initial screen of the recovery and select reboot now.
Like every time you install a new ROM, the first reboot must arm ourselves with patience because it takes something more than usual, but at the end we will have installed CM 11 Nightly our LG G3.
Available link for download
Wednesday, September 7, 2016
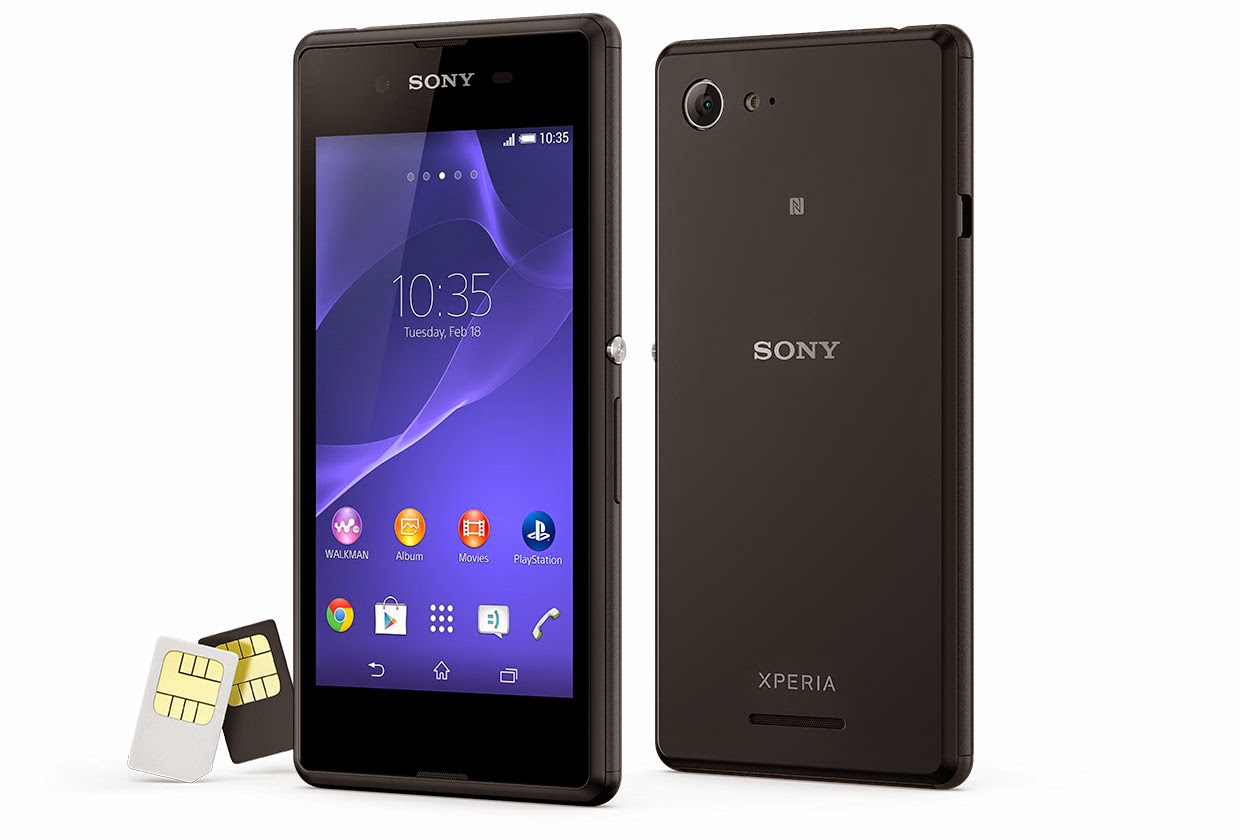
How to install the newest Android 5 1 1 for Sony XPERIA Z C6603 firmware 10 7 A 0 228
How to install the newest Android 5 1 1 for Sony XPERIA Z C6603 firmware 10 7 A 0 228

a) first of all, check your firmware version (if you already have the newest one, you do not need this tutorial)
b) download and install latest Flashtool from this Post
c) download also latest Android 5.1.1 (mirror Google Drive) for Sony XPERIA Z
d) paste the ftf file downloaded in step c) to folder „Firmware“ included in the XPERIA Flashtool
e) open the XPERIA Flashtool, click on flash and choose downloaded firmware, than click ok. Important - if you do not want to delete any data of your phone, just uncheck flashing userdata.sin file. All data will remain in your phone, but sometimes it can cause additional troubles. So it is better (and I recommend that) to do the backup of your personal data, than proceed with clean instalation and then restore your personal data.

f) turn off your phone and when Flashtool shows pop up window, connect phone to PC with holding volume down button
g) after few minutes all is done and your phone gets the new firmware
Available link for download
How to install TWRP recovery of Moto E
How to install TWRP recovery of Moto E
How to install TWRP recovery of Moto E - I recently saw how to access the recovery in Moto E, and the truth is that although it is an important tool to perform several advanced tasks on our device, is not the same make that comes preinstalled with a more advanced use. Therefore we want to show how to install the recovery of TWRP Moto E, in order to take advantage of its best features when it comes to get their hands on our phone.

Is that TWRP is a recovery that with the passage of time is becoming standard, in part because of its functionality touch that actually became so popular that even led to the emergence versions of CWM recovery (formerly the most popular) with support for touch screens.
Here we will modify essential part of running our phone, so it is always advisable to make a Nandroid or a backup of critical data (videos, images, music) in order to have them available in case something goes wrong. We will also need the Android SDK, enable USB debugging (between development options) and last but very important to have a battery charging at least 60 percent.
Now if we can start:
- Download the file recovery of TWRP.
- We turn off the Moto E, waited a few seconds and turn on in fastboot mode (by pressing the keys on Volume- and on and holding them for about 6 or 7 seconds).
- We connect the phone to our PC via the USB cable.
- We go to the folder where you have the Android SDK and open a terminal window (command prompt in Windows).
- We write (without the quotes, of course) "fastboot flash recovery.img".
- On the phone, which is in fastboot mode, we pressed to move and select Volume-recovery (by pressing Power).
- Moto E enters recovery mode, although for the first minute or two still will not have the functionality available touch, so be patient.
- Select the option reboot system now and thats it; next time we enter the recovery we will at TWRP.
Available link for download
How To Unlock Bootloader Sony Xperia E3 Dual D2212 And Install the newest android 4 4 2
How To Unlock Bootloader Sony Xperia E3 Dual D2212 And Install the newest android 4 4 2
how to unlock your bootloader
a) download and install latest Flashtool from here (mirrors Google Drive, Ulozto or Mega)
b) start Flashtool and click on BLU button on the top
c) turn off your phone and when Flashtool shows pop up window, connect phone to PC with holding volume down button
d) click on get unlock key button, it will switch you to Sony Mobile website, here complete all boxes
e) copy IMEI form Flashtool to Sony Mobile site, than you will get unlock code to your mailbox
f) copy unlock key to Flashtool window and than click unlockg) connect phone with holding volume up button when Flashtool shows pop up window
h) wait to unlock finish.
how to install the newest Android 4.4.2 for Sony XPERIA E3 Dual D2212
a) first of all, check your firmware version (if you already have the newest one, you do not need this tutorial)
b) download and install latest Flashtool from here (mirrors Google Drive, Ulozto or Mega)
c) download also latest Android 4.4.2 (mirrors Google Drive or Mega) for Sony XPERIA E3 Dual
d) paste the ftf file downloaded in step c) to folder „Firmware“ included in the XPERIA Flashtool
e) open the XPERIA Flashtool, click on flash and choose downloaded firmware, than click ok. Important - if you do not want to delete any data of your phone, just uncheck flashing userdata.sin file. All data will remain in your phone, but sometimes it can cause additional troubles. So it is better (and I recommend that) to do the backup of your personal data, than proceed with clean instalation and then restore your personal data.
f) turn off your phone and when Flashtool shows pop up window, connect phone to PC with holding volume down button
g) after few minutes all is done and your phone gets the new firmware.
how to relock your bootloader
a) download and install latest Flashtool from here (mirrors Google Drive, Ulozto or Mega)
b) start Flashtool and click on BLU button on the top
b) start Flashtool and click on BLU button on the top
c) turn off your phone and when Flashtool shows pop up window, connect phone to PC with holding volume down button
d) just click on relock button and your bootloader is locked for now.FOR MORE INFORMATION VISIT:-
http://xperiafirmware.com/8-firmware/72-sony-xperia-e3-dual-d2212
if you have any query....ask me in comment column
http://xperiafirmware.com/8-firmware/72-sony-xperia-e3-dual-d2212
if you have any query....ask me in comment column
Available link for download
Saturday, September 3, 2016
How To Install Apps Onto Your SD Card No Root
How To Install Apps Onto Your SD Card No Root

Have you ever ran low on memory space on your android and had to delete some apps? With a computer and a micro SD card you dont have to worry about running out of space on your phone any more! You dont even need to root your phone! After this, your phone will automatically install apps to your external memory.
Note - this works on both Windows and Mac OS
Items needed
1. Android Phone
2. Micro usb cable
3. Computer
Step 1: Getting Ready to Change Installation Location
1. Get the Google Android SDK
- Unzip the file and place the folder onto your desktop or anywhere that can be easily accessed.
- find the platform tools folder (default, it should be : adt-bundle/sdk)
2. Find cmd/terminal (for mac)
- (for mac users) go to [System Preferences > Keyboard > Keyboard Shortcuts > Services]
and then check the box [New Terminal At Folder]
3. Go onto your Android phone and select USB debugging
- Go to [System settings > Developer Options] and select USB Debugging (if the option is grayed out, unplug your phone first)
Step 2: Using adb
1. Windows
- Open the folder called " platform-tools"
- shift+right-click anywhere inside the folder and choose [Open Command Window Here]
Mac
- right-click the folder called "platform-tools" and choose [New Terminal At Folder]
2. Enter in the following
For Windows :
adb devices ---> to view attached device
adb shell ---> to write shell script
$ adb set-install-location 2 ---> to set SD as install location (Set to 0 for Phone)
$ exit
---------------------------------
adb shell pm setInstallLocation 2 ---> to allow all app to move on SD Card (If above fails)
For Mac : (Note - there is a period before the slashes)
./adb devices
./adb shell pm set-install-location 2
./adb shell pm get-install-location
3. Check if you did it right
- if you did it right, the last output should say: 2 [external]
If you did it right, CONGRATS! Your phone will now install your apps to your SD Card by default! Have fun now!
Step 3: More Info

CAUTION
Some apps will not continue to function properly if located on your SD Card.
Moving Apps
[System Settings > Applications > Manage Applications] and select the app your want to move and press move.
Note:
More info image differs in different android versions.
For any queries, Please leave comments bellow.
HELP MAKES ALL HAPPY
Available link for download
Wednesday, August 31, 2016
Cara Flash Install Ulang Android Menggunakan Pc
Cara Flash Install Ulang Android Menggunakan Pc
Cara Flash/Install Ulang Android: Menggunakan Pc dan Tanpa Pc
Cara flash/install ulang android kali ini adalah cara flash/install ulang android lewat PC. Anda harus mengunduh MediaTek USB VCOM (Android) Driver terlebih dahulu agar perangkat android anda dikenal oleh komputer anda. Unduh ROM yang cocok dengan ponsel android anda. Kemudian anda harus mengunduh aplikasi yang bernama SP_Flashtool. Aplikasi ini berguna untuk membuka direktori yang ada di ponsel android anda lewat komputer. Setelah semuanya terunduh, ekstrak dan pasang drivernya terlebih dahulu di komputer anda. Kemudian ekstrak SP_Flashtools di salah satu drive anda dan buka

Available link for download
Tuesday, August 30, 2016
HOW TO INSTALL Huawei Ascend Mate Rom using sd card
HOW TO INSTALL Huawei Ascend Mate Rom using sd card
HOW TO INSTALL Huawei Ascend Mate Rom using sd card

ROM install :
Step one: Prepare an SD card, it is recommended to use Sandisk, Kingstone, or Kingmax, size is recommended that more than 1G.
Step Two: Formatting SD card (optional).
The step three: copy a large package path UPDATA.APP to the SD card dload UPDATA.APP.
Step four: Check the root directory of the SD card you dload UPDATA.APP.
Step 5: SD card into the phone is switched on in the main screen, press the Menu key, the system updates ->SD card upgrade ->confirm ->upgrade, backup data, select the backup data;upgrade.
Step Six: The upgrade process progress bar shows after the finish of the pending progress bar, the phone automatically restart.
or
Step one: Prepare an SD card, it is recommended to use Sandisk, Kingstone, or Kingmax, size is recommended that more than 1G.
Step Two: Formatting SD card (optional).
The step three: copy a large package path UPDATA.APP to the SD card dload UPDATA.APP.
Step four: Check the root directory of the SD card you dload UPDATA.APP.
Step Four: cell phone turned off, insert the SD card, while pressing the volume up button + volume down key switch button, the phone automatically enters the upgrade mode, and then begin the upgrade in Figure
Step Five: After the progress bar to go full fixed, the phone will automatically restart If you do not manually remove the battery.
Available link for download
Sunday, August 28, 2016
How to Install ClockworkMod Recovery CWM on Sony Xperia P ICS and JB
How to Install ClockworkMod Recovery CWM on Sony Xperia P ICS and JB
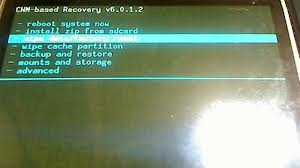
What is CWM? For taking Nandroid Backups, flashing zip files, if you caught in bootloops due to something wrong flashed WITHOUT backup of your important data, you can go for backup in TAR format from CWM Recovery and later on, extract the tar data and put in Titanium Backup to get it back... (YOU CANT USE WHOLE BACKUP THAT HAVE BEEN TAKEN AFTER BOOTLOOPS)
Thanks to atis112 for the Recovery.
Disclaimer : I am not responsible if you brick your phone or if u make any other damage to your phone
Note : This works on both locked and unlocked bootloader devices!!!
REQUIREMENTS :-
1. Stock ICS / JellyBean ROM
2. Root (Instructions to Root Jelly Bean Click Here)
INSTRUCTIONS :-
1. Download this zip package - CWM Recovery 6.0.1.2
2. Extract the zip file.
3. Enable USB debugging from Settings > Developer Options.
4. Enable Unknown sources from Settings > Security
5. Connect your phone to your Computer.
6. Click on install.bat and follow the onscreen instructions.
HOW TO USE :-
1. Power Off your Phone.
2. Power On your Phone.
3. Press the Volume Down Button when you see the Sony Logo ( Tap the Volume Down 2-3 Times )
Source - LINK
Available link for download
Friday, August 26, 2016
How to Install JellyBean 6 2 A 1 100 on Sony Xperia P
How to Install JellyBean 6 2 A 1 100 on Sony Xperia P
Disclaimer : I am not responsible if you brick your phone or if u make any other damage to your phone
Step 1 : First of all download this ftf File from here - DOWNLOAD LINK
Step 2 :
- Download Flashtool from the official website - http://androxyde.github.io/
- Install it on your PC using onscreen instructions.It will create a folder "Flashtool" in your drive(CFlastool)
- Now go to CFlastooldriversflastool-drivers.exe and click on it and install it after marking/checking "xperia p,xperia u,xperia sola drivers" which is below there on the list
- Restart your PC
Note: Make sure you have USB debugging on. If not goto setting>developer options> and check USB debugging on
Step 3 : Now place the downloaded ftf file to C:/Flashtool/firmwares/

Step 4 : Now open Flashtool from the Start Menu
Step 5 : Now click on the FLASH icon of the flashtool which is on the left side of the iconic tab(below the file option-its like a lightning sign).a window will be opened Mode Selector. Check "FlashMode" and press "ok" button.

Step 6 : Now Select the Firware file which you had placed in C:/Flashtool/firmwares/ in Step 3
Step 7 : A Dialogue Box will appear just click on OK

Step 8 : Now the flashtool will prepare files for flashing and then you will be prompted to connect phone in flashmode.

Step 9 :
- Now Power Off your phone and wait for 5 Seconds, then Connect your phone to PC using USB cable while pressing volume down button (-) (Make sure you dont release Volume down button until flashtool starts flashing)
- Flashtool will start flashing firmware it may take some time.
- After flashing flashtool will prompt you to disconnect you phone. Discconet it and power on your phone (It may take some time for the first boot).
- Enjoy the Official Jelly Bean
Thanks dewanshu93
Feel Free to Comment if you have any doubts ;)
Feel Free to Comment if you have any doubts ;)
Available link for download
Thursday, August 25, 2016
How to Install Fastboot Drivers for Sony Xperia Devices on Windows 10 8 1 8 7 XP
How to Install Fastboot Drivers for Sony Xperia Devices on Windows 10 8 1 8 7 XP
asdsad


Available link for download
Wednesday, August 24, 2016
How to install TWRP recovery of the Moto G
How to install TWRP recovery of the Moto G
How to install TWRP recovery of the Moto G - Just recently saw the launch of Android 4.4.2 KitKat for the Moto G, an official update is available OTA (Over the Air) and can be installed in the American variant of this model, but for those with the European variant or international, will have to wait a few more weeks as the update is coming. However, it is possible to enjoy the upgrade through a manual process, ie by installing the ROM.

That if, as you know those who follow these pages, to install any ROM from recovery and we do so we must get unlock the bootloader, a step that we saw a few days ago. Lets see how to install the recovery of TWRP in the Moto G, so be ready to install a custom ROM with which we can enjoy several improvements that developers added.
The first step is to download the file containing the recovery, which we do from this link, or from this one. We keep it in a folder on our PC, making sure your name is recovery.img (without the quotes, of course). Now, we open a terminal window or system (Windows) and we have to run the following command, assuming fastboot tools which have already been installed to unlock the bootloader- are in the system path.
fastboot flash recovery recovery.img
The process is very fast, it does not take more than about 30 seconds at most, and at the end we will have installed TWRP recovery of the Moto G, which has gained much popularity in recent years thanks to being tactile buttons and thus big enough streamline the use of this part so important in using ROMs, kernels, Nandroids and formatting partitions.
Available link for download
Tuesday, August 23, 2016
How to Install CyanogenMod 11 M6 on LG G2
How to Install CyanogenMod 11 M6 on LG G2
How to Install CyanogenMod 11 M6 on LG G2 - a day which saw the arrival of the new stable version of CyanogenMod, this ROM has always had a huge community of developers behind and recently aims to launch new stable releases every 2 weeks ago. One of the strengths of CM is the fact that they are available for a large number of devices, over 50, and now we will see how to install CyanogenMod M6 in the LG G2.
One of the devices increased sales in recent times, besides being a major life have managed to raise the numbers of the Korean company. Before starting, so yes, check our model LG G2 D802, which is sold internationally but since there is also the D801 in some Asian markets that can be exported or sold through some portals SHOULD be completely safe.

Another thing to keep in mind before starting is to make a backup of our data or better yet create a Nandroid because although in theory it does not change anything that we saved on the SD card we are never free of a problem or error. And we must also remember having a battery charge is at least 60 percent, to avoid unpleasant surprises.
Of course, our LG G2 must have root access released, something that we have seen recently how to do. Now if we can start:
- We CyanogenMod 11 M6 downloaded from this link, and do the same with the package of gapps from this link.
- LG G2 connect our PC via USB cable and transfer both packages to the phone memory.
- We turn off the phone, wait a few seconds and restart in recovery mode, which got Volume- pressing buttons and on for 2 to 3 seconds until the LG logo see appear; then turn them loose for a second and press again, this time until we see recovery appear.
- Now we install CM 11 M6 and once ends we repeat the process but this time for gapps.
- Once completes installation of both packages back to the initial screen of recovery and select the option reboot.
- Thats it, we just have to have some patience because in the first restart your phone you need to set the ROM, and at the end we will have CyanogenMod 11 M6 in our LG G2.
Available link for download
install cyanogenmod android lollipop 5 1 1 on galaxy s2 i9100 i9100P step by step
install cyanogenmod android lollipop 5 1 1 on galaxy s2 i9100 i9100P step by step

Stable is after all the features desired by the CM devlopers have been put in and the code has been tested.
Snapshots (M builds) are builds done roughly once a month that has had some testing to make sure things are mostly working and released to the public. These are the first builds that allow official bug reports on the project manager site.
Nightlies are automated builds that are built, well, every night. There is no human interaction with these and they are largely there just to see if the code added throughout the day will compile. As far as the devs are concerned, there are no bad builds with the nightlies, because if it doesnt build, that is news to let them know that something is screwed up in the code. They dont accept any bug reports on these builds.
Generally, the nightly builds, while extremely experimental and considered bleeding-edge, tend to be relatively stable and mostly bug-free. Many people use the nightlies as their so-called daily-driver, meaning that any bugs that they may have arent so severe that they want to switch to a different version.
Important:
1-Avoid to install Nightly roms, because in some versions you will not be allowed to enter to download mode if somthing bad happend.
2-if something bad happend with the installation (be sure problems happend if you dont fellow instructions), you can solve the problem by installing stock rom with Odin.
Links to stock roms:
-i9100......... I9100XWLSD_I9100OJVLS6_KSA--www.samsony.net--.zip - 570.54 MB
-i9100P.......XEF-I9100PXXLSU-20130828084437.zip - 556.19 MB
-Odin flasher Share Odin_v3.07
How to install cyanogenmod?
first step: install CWM Recovery
-If you have a cm11(kitkat rom)installed on your galaxy s2, you are good to go & no need to install a CWM Recovery again (its compatible with cm12 (lollipop rom).
but avoid to install cm12 by OTA Method because the no comptability of apps.
-If you are using a stock rom, install CWM Recovery manually using Odin:
1-Download Compatible CWM Share CWM6.0.4.5-KitKat lollipop-i9100.tar - 5 MB
2-Download odin Share Odin_v3.07
3-choose pda & click star (check only Auto Reboot & F. Reset Time)
4-Dont touch anything till the phone get fully on.
Second step: install cm12 & google apps via Recovery:
1-download cm12 latest release
https://download.cyanogenmod.org/?device=i9100

2-Download google apps
3-Copy cm12 rom & apps zip files to phone (internal or extarnal memory card)
4-Enter recovery mode
*CM11 users go to sitting/ developer tab/ enable advanced reboot
*others shut down phone (home button+ volume+ + power button) or download any app from google store allow you to go directly in recovery mode.
5-Do factory wipe & Wipe cach partition. go advanced and do wipe dlvk.
6-dont reboot your phone, go install zip file from sd card ( install cm12 rom then instal google apps). reboot your mobile wait till the installation complete.
ENJOY!!!
Available link for download
Thursday, August 18, 2016
How to install the Sonyś Android Concept ROM Android 6 0 Marshmallow
How to install the Sonyś Android Concept ROM Android 6 0 Marshmallow

a) first of all - this ROM is not similar to stock ROM. Many features miss like some Sony stock applications like Messaging or Video. There are also not XPERIA Themes or Stamina mode included. But ROM is fully working and it is very similar to clean Android. You can any time switch back to stock Sony ROM. But try it, you will like it.
b) download and install latest Flashtool from this article
c) download also latest Sony? Android Concept (mirrors Google Drive or Mega) for Sony XPERIA Z3
d) paste the ftf file downloaded in step c) to folder „Firmware“ included in the XPERIA Flashtool
e) open the XPERIA Flashtool, click on flash and choose downloaded firmware, than click ok. Important - if you do not want to delete any data of your phone, just uncheck flashing userdata.sin file. All data will remain in your phone, but sometimes it can cause additional troubles. So it is better (and I recommend that) to do the backup of your personal data, than proceed with clean instalation and then restore your personal data.
f) turn off your phone and when Flashtool shows pop up window, connect phone to PC with holding volume down button. When Flashtool ask you if use FSC script, hit NO
g) after few minutes all is done and your phone gets the new Android
Available link for download
How to Install ClockworkMod Recovery CWM on Sony Xperia Go ICS and JB
How to Install ClockworkMod Recovery CWM on Sony Xperia Go ICS and JB

What is CWM? For taking Nandroid Backups, flashing zip files, if you are caught in bootloops due to something wrong flashed WITHOUT backup of your important data, you can go for backup in TAR format from CWM Recovery and later on, extract the tar data and put in Titanium Backup to get it back... (YOU CANT USE WHOLE BACKUP THAT HAVE BEEN TAKEN AFTER BOOTLOOPS) and for many more things :P you can search on google to know more about CWM ;)
Thanks to atis112 for the Recovery.
This recovery is only for Xperia Go (ST27i/ST27) do not try it on any other phone. This works on Ice Cream Sandwich 4.0.4 as well as on Jelly Bean 4.1.2.
Disclaimer : I am not responsible if you brick your phone or if u make any other damage to your phone
Note : This works on both locked and unlocked bootloader devices!!!
REQUIREMENTS :-
1. Stock ICS / JellyBean ROM
2. Root (Instructions to Root Jelly Bean Click Here)
INSTRUCTIONS :-
1. Download this zip package - CWM Recovery 6.0.1.2
2. Extract the zip file.
3. Enable USB debugging from Settings > Developer Options.
4. Enable Unknown sources from Settings > Security
5. Connect your phone to your Computer.
6. Click on install.bat and follow the onscreen instructions.
HOW TO USE :-
1. Power Off your Phone.
2. Power On your Phone.
3. Press the Volume Down Button when you see the Sony Logo ( Tap the Volume Down 2-3 Times )
Source - LINK
Available link for download
Tuesday, August 16, 2016
How To Install Vcom MTK Preloader Driver for all MTK Android Phones
How To Install Vcom MTK Preloader Driver for all MTK Android Phones
How To Install Vcom (MTK Preloader) Driver for all MTK Android Phones
REQUIREMENTS FOR THE INSTALLATION
A Pc (windows 7 or
An MTK phone
VCOM DRIVERS HERE
And a working brain of course
Download VCOM Drivers from the above link and extract the file to your desktop. Make sure you download it properly. You must be a profession in the game and or if you want me to give guides on how to extract it won’t be that difficult. I am running on Win7 here, but you should be able to follow these steps on win8 as well (that’s if you are an expert in the game). So from desk top click on start button and move the course to the search bar saying “search programs and files” then type in device manager. Win8, I believe you can locate you Pcs search bar. It’s somewhere at the right screen side. Take the course to the other end and a searching icon should slide out.
After typing in “device manager” windows would give you some
list of result based on the keywords, there just select “device manage”. Click
on it.
From the displayed window, you should have s list of Devices running with you system, click/highlight any of the items there and move the cursor to the “Action” link from the menu bar. From the options, select “add legacy hardware.


Now, you should have a new window on you screen that raises; “Welcome to the Hardware Wizard! If your hardware came with an installation of blah blAH, who cares to read that? Click on Next!

Then, a new window will appear asking you what you want the wizard to do, well, from the options there tick on “Install the driver I manually select from a disk (advance)” and of course click on Next! Yes, the new window says; from the list below select the type of hardware you are installing. Highlight the “Show all device” then Next.

On the new window, select the device driver you want to install for this hardware. You are gonna browse the path now, I mean the file you
extracted earlier. Now click on “Have Disk” from the window. Click on browse from the dialogue that pops up.


You extracted the VCOM Drivers folder to you desktop, browse it and open the folder, there should be a folder in side, Open it, then open “USB VCOM Drivers” from the three folders. Now, it is left to you to decide the set of OS you are using, open the appropriate one select either “usb2ser_Win7.inf” (for 64 bit) or “usb2ser_Win764” for 86bit and click on ok.
REQUIREMENTS FOR THE INSTALLATION
A Pc (windows 7 or
An MTK phone
VCOM DRIVERS HERE
And a working brain of course
Download VCOM Drivers from the above link and extract the file to your desktop. Make sure you download it properly. You must be a profession in the game and or if you want me to give guides on how to extract it won’t be that difficult. I am running on Win7 here, but you should be able to follow these steps on win8 as well (that’s if you are an expert in the game). So from desk top click on start button and move the course to the search bar saying “search programs and files” then type in device manager. Win8, I believe you can locate you Pcs search bar. It’s somewhere at the right screen side. Take the course to the other end and a searching icon should slide out.
After typing in “device manager” windows would give you some
list of result based on the keywords, there just select “device manage”. Click
on it.
From the displayed window, you should have s list of Devices running with you system, click/highlight any of the items there and move the cursor to the “Action” link from the menu bar. From the options, select “add legacy hardware.
Now, you should have a new window on you screen that raises; “Welcome to the Hardware Wizard! If your hardware came with an installation of blah blAH, who cares to read that? Click on Next!
Then, a new window will appear asking you what you want the wizard to do, well, from the options there tick on “Install the driver I manually select from a disk (advance)” and of course click on Next! Yes, the new window says; from the list below select the type of hardware you are installing. Highlight the “Show all device” then Next.
On the new window, select the device driver you want to install for this hardware. You are gonna browse the path now, I mean the file you
extracted earlier. Now click on “Have Disk” from the window. Click on browse from the dialogue that pops up.
You extracted the VCOM Drivers folder to you desktop, browse it and open the folder, there should be a folder in side, Open it, then open “USB VCOM Drivers” from the three folders. Now, it is left to you to decide the set of OS you are using, open the appropriate one select either “usb2ser_Win7.inf” (for 64 bit) or “usb2ser_Win764” for 86bit and click on ok.


From the model, click on Mediek Preloader USB VCOM Port and kindly click next. Ignore driver not digitally signed caution. Next, next, and finally, wait for the installation to complete. A window will come up saying the software for the device is then installed and may not work. This might get you bothered but don’t worry. It will work fine. Ignore the (Code 10) blah and click finish.

Noticing Mediatek Preloader USB VCOM Port (COMXX) is indicating the installed drivers. You can now flash whatever as the PC is now able t detect your device.

Available link for download
Subscribe to:
Posts (Atom)